
Loading...
Loading...
Loading...
Loading...
Loading...
Loading...
Loading...
Loading...
Loading...
Loading...
Loading...
Loading...
Loading...
Loading...
Loading...
Loading...
Loading...
Loading...
Loading...
Loading...
Loading...
Loading...
Loading...
Loading...
Loading...
Loading...
Loading...
Loading...
Loading...
Loading...
Loading...
Loading...
Loading...
Loading...
Loading...
Loading...
Loading...
Loading...
Loading...
Loading...
Loading...
Loading...
Loading...
Loading...
Loading...
Loading...
Loading...
Loading...
Loading...
Loading...
Loading...
Loading...
Loading...
Loading...
Loading...
Loading...
Loading...
Loading...
Loading...
Loading...
Loading...
Loading...
Loading...
Loading...
Loading...
Loading...
Loading...
Loading...
Loading...
Loading...
Loading...
Loading...
Loading...
Loading...
Loading...
Loading...
Loading...
Loading...
Loading...
Loading...
Loading...
Loading...
Loading...
Loading...
Loading...
Loading...
Loading...
Loading...
Loading...
Loading...
Loading...
Loading...
Loading...
Loading...
Loading...
Loading...
Loading...
Loading...
Loading...
In the event of an outage, please consult the Illumina Cloud Products Status page below for the latest updates and guidance.
Illumina Cloud Products Status
If you suspect that an outage is causing issues, please consult the document below for commonly recommended mitigation strategies
If a library pool has already been loaded into a sequencing reagent cartridge, is it possible to remove the library and re-use the reagent kit with the same or a different library pool (if sequencing has not been performed)?
Generally, once the library is loaded into a reagent cartridge, Illumina does not recommend removing the library pool. If sequencing is significantly delayed after loading a library pool, contact Illumina Technical Support for additional information.
For any feedback or questions regarding this article (Illumina Knowledge Article #7771), contact Illumina Technical Support .
Instrumentation > General > FAQ
The Real Time Analysis (RTA) software calculates the percentage of reads passing filter that align to the PhiX reference genome. PhiX alignment is calculated over the first 25 cycles of the insert reads. If there are >2 mismatches in the first 25 cycles, a read will not be called as PhiX.
To determine the number of reads needed for the run (project), multiply the desired reads per sample by the number of samples in the pool. With the total number of reads, identify the kit and sequencer that fits the data needs using the sequencer specifications pages, listed below.
Illumina Knowledge is a repository of 1673 FAQs, troubleshooting articles and reference material for Illumina products and workflows, covering all Illumina Microarrays and every stage of Sequencing.
Use the navigation bar on the left of the page to find areas of interest and content types, use the search function at the top to query keywords.
For any feedback or questions regarding this article (Illumina Knowledge Article #5576), contact Illumina Technical Support [email protected].
1. Open Command Prompt
Select the Start button
Enter cmd in the search box to open the Command Prompt
Press Enter
2. Run the Following Commands
Enter each command into the Command Prompt, select Enter after each entry:
net user sbsuser
net user sbsadmin
These commands display account details, including:
Password last set date
Password expires
Account active status
3. Review or Share the Results
Take a screenshot of the output to share with Illumina Technical Support as needed.
For any feedback or questions regarding this article (Illumina Knowledge Article #3269), contact Illumina Technical Support .
For any feedback or questions regarding this article (Illumina Knowledge Article #6622), contact Illumina Technical Support .
How to analyze an incomplete run using BCL Convert (February 23, 2026)
Check out our NEW resource for End-to-end sequencing and microarray training at Illumina Solutions Centers in the Americas. (May 31, 2024)
Click the link above to check on the status of Illumina cloud software products.
Background
Each Illumina platform has either a Windows or Linux OS environment that the Control Software will run in. The following lists available Illumina platforms and the associated OS version according to instrument platform or Control Software version, where applicable.
All current versions of the Windows and Linux OS on Illumina platforms use the Long Term Support (LTS) versions which have extended service lifecycles.
Illumina Sequencing Platforms
iSeq 100 platform: Windows 10 Enterprise 2016 LTSB, Version 1607
MiniSeq MnCS v2.x: Windows 10 Enterprise 2019 LTSC, Version 1809
MiSeq MCS v4.x: Windows 10 Enterprise 2019 LTSC, Version 1809
NextSeq 500/550 NCS v4.x: Windows 10 Enterprise 2019 LTSC, Version 1809*
NovaSeq 6000, Model 30.0.C06.########: Windows 10 Enterprise 2016 LTSB, Version 1607*
NovaSeq 6000, Model 30.1.C01.########: Windows 10 Enterprise 2019 LTSC, Version 1809*
NextSeq 1000/2000 platforms: Linux CentOS 7
Note: NextSeq 1000/2000 Control Software v2.0.0 has the Oracle 9 Linux operating system.
NovaSeq X Series:
SBC: Oracle Linux Server 8 - Kernel: 4.18.0-425.13.1.el8_7.x86_64
CE/COMe: Oracle Linux 8 - Kernel: 4.18.0-372.32.1.0.1.el8_6.x86_64
MiSeq i100 Series:
CE/COMe: Oracle Linux Server 9 - Kernel: 5.14.0-427.13.1.el9_4.x86_64
Illumina Array Platforms
iScan Platforms**
A8202 Supporting PC: Windows 10 Enterprise 2016 LTSB, Version 1607
Tecan Platforms
* For the NextSeq 500/550 and NovaSeq 6000, the Windows 10 LTS version depends on the the manufacturing date and current Software image. Use the following steps to confirm the Windows OS version.
From the Windows Start menu, select Settings.
In the Settings window, select System and then select About in the menu on the left.
The Windows OS version is listed under Windows specifications header.
** For the iScan platform, the Windows OS version will depend on the Supporting PC version that is supplied with the iScan instrument. To determine the version, check the white label sticker on the side of the Supporting PC.
Please see for more information.
The HiSeq platforms are all currently discontinued; however, Illumina will continue to provide reagents and full support on these instruments until the following dates. See each link for the support page of each instrument.
HiSeq 1500: 28-FEB-2023 (Link)
HiSeq 2500: 28-FEB-2023 (Link)
HiSeq 3000: 28-FEB-2023 ()
HiSeq 4000: 31-MAR-2024 ()
HiSeq X Five and Ten: 31-MAR-2024 ()
Articles published to Illumina Knowledge in the past 2 months:
(February 25, 2026)
(February 23, 2026)
No. The flow cell RFID is unique to the flow cell and the reagent cartridge RFID is unique to the reagent cartridge. Each component in a reagent kit has its own RFID code that is read independently.
Note: Illumina reagents are equipped with a radio-frequency identification (RFID) tag to enable accurate consumable tracking.
Check out our NEW resource for . (May 31, 2024)
For any feedback or questions regarding this article (Illumina Knowledge Article #2528), contact Illumina Technical Support [email protected].
Illumina Automation Control (IAC): Windows 10 Enterprise 2019 LTSC, Version 1809 (32-bit)
Tecan/Hamilton Platforms: Windows 10 Enterprise 2019 LTSC, Version 1809
The model number, if applicable, is listed under the Device specifications.
For any feedback or questions regarding this article (Illumina Knowledge Article #6353), contact Illumina Technical Support [email protected].
For any feedback or questions regarding this article (Illumina Knowledge Article #6963), contact Illumina Technical Support [email protected].
Bulk Deletion of Runs and Projects Using BaseSpace CLI with Windows PowerShell (February 12, 2026)
What is the maximum Sample ID length? (February 12, 2026)
How to requeue a MiSeq i100 Series run locally (on the instrument) (February 9, 2026)
如何在MiSeq系统上重启RTA (February 2, 2026)
How to check flow cell vacuum pressure on the NovaSeq 6000 (January 29, 2026)
How to import Demo Data into Illumina Connected Multiomics (January 28, 2026)
BlueFuse Multi: How to mark regions as "Not Reported" (January 22, 2026)
How to enable ssh access on the NovaSeq X Series (January 21, 2026)
Configuring Time Settings on the MiSeq i100 Series (January 20, 2026)
How to Access and Share Illumina Connected Multiomics (ICM) Analysis Logs (January 20, 2026)
How to check what version of Illumina Connected Multiomics is released (January 20, 2026)
How to optimize ICM (Illumina Connected Multiomics) Data Viewer Performance (January 20, 2026)
How to set up a DRAGEN array cloud analysis run (Video) (January 20, 2026)
Illumina Single Cell 3' RNA Prep, T10 Workflow (Video) (January 20, 2026)
Illumina Single Cell 3' RNA Prep, T100 workflow (Video) (January 20, 2026)
Illumina Single Cell 3' RNA Prep, T2 Workflow (Video) (January 20, 2026)
Illumina Single Cell 3' RNA Prep, T20 Workflow (Video) (January 20, 2026)
Library Prep Bead Handling Workflows Best Practices LNB1/2/3 (Video) (January 20, 2026)
Library Prep Bead Handling Workflows Best Practices SMB (Video) (January 20, 2026)
Library Prep Bead Handling Workflows Best Practices SPB/IPB Video (January 20, 2026)
Does the DRAGEN system process multiple samples in parallel? (January 6, 2026)
How to access Illumina Admin Console for Illumina Connected Software (January 6, 2026)
Importing raw Single Cell RNA Data into Illumina Connected Multiomics (January 6, 2026)
Information on controls used in TruSight Oncology 500 demo datasets (January 6, 2026)
TruSeq DNA PCR Free library preparation input (January 6, 2026)

Why are there different amounts of dry ice in different shipments? Depending on the temperatures that the shipment encounters in transit, there may be differences in the amounts of dry ice left in containers upon delivery. If there is any dry ice left in the container, then the product is good to use. Dry ice quantities have been optimized for ideal product quality in transit. Illumina continues to work on reducing environmental impact and improving customer experience.
Gel packs are not fully frozen. Is this an issue? Gel packs have been validated to maintain temperature for transit durations based on historical data and may not be frozen upon delivery. For any specific concerns or questions about the integrity of the product(s) ordered, contact Illumina Technical Support.
Illumina frozen product boxes are tearing when separating them. Is this a risk to the product? Boxes may freeze together because of condensation and extreme cold due to dry ice. This damage occurs when the boxes are separated immediately after removing from contact with dry ice, is cosmetic only, and does not affect product performance. Letting the boxes sit out at room temperature for approximately 5 minutes after removal from insulated containers will allow them to separate without cosmetic damage.
Why are some shipping containers wet? Condensation on the shipping containers is due to extreme temperature differences between the dry ice and product inside the insulated container during hot and/or humid weather conditions. Shipping containers have passed rigorous thermal and simulated distribution testing, and condensation does not affect the products inside.
My product came shipped at a different temperature than the storage temperature. Is the product okay? To minimize Illumina's environmental footprint and provide an efficient unpacking experience, some products are tested to be able to ship at different temperatures than their recommended storage conditions. Always check the product label for the appropriate storage condition of your products upon receipt. These products have passed rigorous testing and evaluation for product quality throughout Illumina’s global supply chain.
What are the foil/silver bags in dry ice shipments? To minimize condensation, Illumina has implemented metallized bags inside of some longer-duration shipments.
How should shipping containers and insulation be disposed? Refer to the shipping box graphics to determine how to best dispose of (or return) specific shipping containers and insulation. If no instructions are given, boxes can be disposed of through the waste stream.
Why do some shipments include both foam containers and sustainable containers? Shipping container selection depends on the site shipping the product and the availability of locally sourced materials. Illumina continues to increase the percentage of sustainable insulated containers as Illumina is committed to reducing environmental impact. See the for more information.
The packaging is damaged. Is a replacement product required? Most packaging damages are minor and do not pose a risk to the product. Outer packaging has been designed to take on impact to protect the product inside. For specific concerns or questions about the integrity of the product(s) ordered, contact . Examples of acceptable conditions include:
Reduced quantity of dry ice is present with frost still visible.
External minor damage to insulated container with no impact to product or any other contents.
In the event of a power outage, an Uninterruptable Power Supply (UPS) sustains power to the instrument for a brief period of time. If the UPS fully discharges, or no UPS is connected, the sequencer will lose power and, if there is a run in progress, the run will be aborted.
When the power is restored, follow guidance in the instrument's system guide to power the system back on.
If the instrument was idle at the time power was lost, no additional actions are needed, provided that the control software initializes successfully.
If a run was in progress when power was lost, the run terminates, the data and reagents cannot be recovered, and the run cannot be resumed. After powering up the sequencer, perform a manual post-run wash before the next sequencing run.
Box edges slightly bent with creases or tears but integrity of box not impaired.
For any feedback or questions regarding this article (Illumina Knowledge Article #8401), contact Illumina Technical Support [email protected].


For any feedback or questions regarding this article (Illumina Knowledge Article #6975), contact Illumina Technical Support .
What are Group Policy Objects (GPOs) and how do they work?
GPOs are a hierarchical infrastructure that allows a network administrator to implement specific configurations for groups of users and computers that are joined to a domain on the network.
Typically, GPOs are security policies that ensure computers on a network adhere to common safety practices. However, this can sometimes perform actions such as installing antivirus or security software, restricting programs from running, or removing permissions that can inhibit instrument operation. Running a GPO Report can provide information on what GPOs and Local Policies have been applied to the control computer on Illumina instruments.
How to generate a GPO report
Important: GPO Reports must be collected from a Command Prompt with elevated permissions. When opening the Command Prompt, select 'Run as Administrator' even if already running as a local Administrator account (this is required).
To generate a GPO report, see the following instructions:
In the Windows Search Bar, type 'cmd' then right-click the App and select 'Run As Administrator'
Enter the sbsadmin credentials if prompted.
In the Command Prompt window, type gpresult /v /r > C:\Illumina\GPO-Result.txt and press Enter.
If there are any errors that present when running a GPO report, contact .
1- Is there any preparation required for the upgrade?
A: We recommend that users inform their organization's IT team regarding the upgrade to ensure rapid connection back to their network. A pre-upgrade checklist will be provided when the upgrade is scheduled.
Is there a way to check whether my instrument is on Windows 7 Professional or Windows 7 Embedded?
A: In the Windows 7 operating system, go to Control Panel > All Control Panel Items > System. Windows edition will show as Windows 7 Professional or Windows 7 Embedded.
Where are the Extended Security Update (ESU) licenses for Windows 7 Professional available?
A: See our page for more details.
Will there be any impact on the instrument if it stays on Windows 7?
A: While instruments will continue to function normally, we encourage the upgrade to Windows 10. Using an unsupported operating system increases the risk of exposure to malware. If users choose to remain on Windows 7, they should take appropriate steps to minimize exposure.
Who is responsible for upgrading the instrument?
A: When ready to upgrade an instrument, reach out to Illumina Technical Support or to your local field team to schedule a visit from an Illumina Field Service Engineer who will perform the upgrade.
Can I upgrade the instrument on my own?
A: No, the upgrade requires a visit from an Illumina Field Service Engineer.
Is there a cost to upgrade an instrument under a service contract?
A: No. Instruments under an active service contract of any tier will have their upgrade covered.
What is the cost to upgrade an instrument that is not under a service contract?
A: The cost will vary per instrument. Reach out to Illumina Technical Support or your local field team to request a quote.
NOTE: Microsoft has announced that standard retail versions of Windows 10 will reach End of Life (EoL) in October 2025. However, t****his does not apply to Illumina instruments, see for more information.
To check the .NET Framework version on instruments running Windows Operating Systems, follow the steps below.
First, open the windows file explorer and navigate to C:\Windows\Microsoft.NET\Framework. There will be a few folders with "V.x"
Open the folder with the highest version (V).
Within this folder, right click any of the .dll files and select Properties.
Select Details tab; the .NET framework version can be found under File version.
The control software for all instruments will allow the reagents to be used the day of expiration thus they are still within their expiration until the end of that day.
For example: If the expiration date states 25-Oct-2022, the reagents are within Illumina's consumable warranty if used on 25-Oct-2022 and can be used until 26-Oct-2022.
For any feedback or questions regarding this article (Illumina Knowledge Article #7148), contact Illumina Technical Support .
What is a communication protocol, in simple terms?
When data is transferred from Illumina sequencers and servers to a user network storage location, there are different levels of Server Message Block (SMB) protocols that can be employed.
What are the latest secure communication protocols supported on Illumina instruments?
All Windows 10 systems support SMB 3.1.1
The NextSeq 1000/2000 (CentOS 7) supports SMB 3.0
The NovaSeq X/X Plus (Oracle Linux 8) supports SMB 3.1.1
When creating SampleSheets, the Sample ID field is used to identify samples, and to name the FASTQ files generated.
The Sample ID field can contain alphanumeric characters, hyphens and underscores, with maximum lengths depending on the software used for Sample Sheet creation and analysis:
-BaseSpace Run Planning: Maximum of 100 characters.
-Local Run Manager v3: Maximum of 40 characters*.
-Local Run Manager v4: Maximum of 90 characters*.
*NOTE: Local Run Manager will not allow for hyphens and underscores to be at the end of the Sample ID, they need to be in the middle.
Due to differences in chemistry and hardware, libraries exhibit different clustering efficiencies on different Illumina sequencing platforms. Migrating libraries between platforms requires instrument-specific optimization of cluster density.
Listed are guidelines for determining the loading concentration of a library that is being migrated to a different Illumina sequencing platform:
Between MiniSeq and NextSeq 500/550 platforms
When sequencing libraries with low base diversity, unbalanced nucleotide composition can negatively impact cluster mapping (on non-patterned flow cells) and template registration (on non-patterned flow cells) along with data quality and data output.
For more information on the importance of base diversity on Illumina sequencing platforms, refer to the bulletin
To compensate for low base diversity in libraries, Illumina recommends spiking in the PhiX Control v3 Library (catalog number , commonly referred to as “PhiX”) for sequencing. The PhiX Control v3 Library has a diverse base composition (45% GC and 55% AT) that provides the balanced fluorescent signals that low diversity sample libraries lack during each sequencing cycle. This, in turn, assists with cluster mapping/template registration and improves overall run performance.
For more information about using PhiX Control v3 Library, refer to the bulletin
This table lists the percentage of PhiX Control v3 library Illumina recommends spiking in when running low diversity libraries on the indicated sequencing platforms and control software versions.
The NovaSeq 6000 uses two-channel chemistry and Patterned Flow Cells technology.
Two-Channel SBS Chemistry, rather than using a separate dye for each base like the Four-Channel SBS Chemistry, two-channel SBS simplifies nucleotide detection by using two fluorescent dyes and two images to determine all four base calls (Figure1).
Figure1: Two-Channel SBS Chemistry by schematic representation.
Images are taken using red and green filter bands. Thymines are labeled with a green fluorophore, cytosines are labeled with a red fluorophore, and adenines are labeled with both red and green fluorophores. Guanines are permanently dark (Figure 2). Nucleotides are identified by analysis of the different emission patterns for each base across the combination of Image 1 and Image 2 that are processed by image analysis software to identify which bases are incorporated at each well position.
Background
Windows Credential Manager is a built-in tool within Windows 10 that is used to store network credentials used when authenticating connections to network storage. Adding network credentials to Credential Manager is a critical step for ensuring that Local Run Manger and Universal Copy Service have appropriate access to network storage.
If the network credentials change, see the following steps to update them within Credential Manager and restore network storage access.
Resolution Actions
Ensure that the user is logged in as the account that is used for sequencing, typically
If an instrument is located in an area that is expected to be affected by a natural disaster (hurricane, tornadoes, storms, etc), see the following instructions to prepare them:
Perform washes as instructed in the
Power off the instrument via normal processes in the instrument system guide.
Illumina has recently discovered that use of ammonia-based cleaners or sanitizing products near sequencing run setup (lab benches, pipettes, etc.) can result in decreased sequencing run performance metrics. Decreased or variable cluster densities and low starting intensities have been seen by customers.
The mechanism by which this effect occurs may be linked to the effect of ammonia on DNA structure ().
If you are experiencing variable cluster density (on nonpatterned flow cells), variable percent clusters passing filter (for both patterned and nonpatterned flow cells), or lower than expected starting intensities on your sequencing runs, make sure that ammonia-based cleaners are not used in the lab environment. Inspect ingredient lists of cleaners or antibacterial wipes for ammonia or quaternary ammonium compounds such as benzalkonium chloride (alkyldimethylbenzylammonium chloride) and dialkyldimethylammonium chloride.
If ammonia-based cleaners have been used, Illumina recommends:
Accurate and robust sequencing of on the NextSeq 500/550 and MiniSeq requires well-designed experiments and informatics pipelines. A common example of a low diversity library is an amplicon-based library preparation method, such as 16S metagenomics. These libraries tend to have DNA sequences that start at the same location - the probe binding site - and are mostly identical. A single represented locus causes a biased base composition that can change drastically from cycle to cycle.
The NextSeq 500/550 and MiniSeq systems use . Therefore, it is important to have all 4 DNA bases represented in every cycle, in order for the software to correctly identify DNA clusters and perform accurate base calling. To meet this requirement using a low diversity library, we recommend experimental designs that provide cycle-to-cycle diversity using the following methods:
Use indexing to add multiple, indexed samples from various applications to the run.
The Sequencing Analysis Viewer (SAV) is a software application where users can view quality metrics generated during a sequencing run by Real-Time Analysis (RTA) software on Illumina sequencing systems. RTA is compatible with iSeq 100, MiSeq, MiSeq i100, MiniSeq, NextSeq 500/550, NextSeq 1000/2000, NovaSeq 6000, NovaSeq X Series, and the available Dx versions for some of these instruments.
For viewing these metrics on SAV, the following is needed:
InterOp folder
RunInfo.xml
Patterned flow cells consist of a nanowell substrate with billions of ordered wells. Compared to nonpatterned flow cells, the uniform cluster sizes enable optimal spacing and increased cluster density. See Knowledge Article Calculating Percent Passing Filter for Patterned and Nonpatterned Flow Cells for more information.
Instruments that use patterned flow cells: NovaSeq 6000, NovaSeq X/X Plus, NextSeq 1000/2000, MiSeq i100, iSeq 100, HiSeq 3000/4000/X.
Instruments that use non-patterned flow cells: MiSeq, NextSeq 500/550, MiniSeq, HiSeq 1000/1500/2000/2500.
The %Occupied by %Pass Filter plot allows users to optimize the loading concentration for NovaSeq 6000 and iSeq 100. The %Occupied and %Pass Filter metrics can be plotted in Sequencing Analysis Viewer (SAV) to determine if a run was underloaded, optimally loaded, or overloaded. This tutorial covers how to create the plot and how to interpret it.
<
Video length: 1:57 min
This information is also available in written form. For further information, search for Knowledge Base article Plotting %Occupied by %Pass Filter to optimize loading concentration for NovaSeq 6000 and iSeq 100 platforms.
This video highlights which run metrics and thumbnail images to monitor during a run to diagnose over clustering of a nonpatterned flow cell.
<
Video length: 8:01 min
For further information, see .
On December 10, 2021 Illumina was made aware of a vulnerability in the Apache Log4j software suite (CVE-2021-44228, CVE-2021-45046, and CVE-2021-44832). This software component is a Java-based logging utility and part of the Apache Logging Services Foundation products.
After we became aware of the issue, we launched an investigation to identify potentially affected products and assess risk and found the Illumina ProActive Portal to be unaffected.
Illumina takes data privacy and security issues very seriously, and we hope this information helps alleviate any concerns about this vulnerability. If you have any questions, contact .
If there is not enough wash solution in the wash tray during a manual wash, this can introduce air into the system which can negatively impact subsequent sequencing run performance.
To fix this, Illumina recommends performing 2-3 maintenance washes on the instrument to flush the fluidics lines and remove any air bubbles.
Sequencing Analysis Viewer (SAV) Software is an application where users can view important quality metrics generated during sequencing runs. This support webinar video provides a guided tour for beginners on how to use SAV, as well as tips and tricks for reviewing the most useful information for sequencing runs. The following topics are covered: how to load data into SAV, what metrics are available in each tab of the software, and understanding which are the most valuable metrics for run review and where to find them.
<
Video length: 32:46 min
Illumina next-generation sequencing technology allows for massive parallel sequencing. This support webinar video discusses Illumina library construction, cluster generation methods by platform, sequencing by synthesis, multiplexing, and primary analysis.
<
Video length: 41:43 min
Although over clustering is not possible on a patterned flow cell, loading a library with a suboptimal concentration negatively impacts run data. In this video, we discuss preventing and diagnosing common clustering issues on patterned flow cells.
<
Video length: 4:48 min
For further information, see .
For any feedback or questions regarding this article (Illumina Knowledge Article #7801), contact Illumina Technical Support [email protected].
For any feedback or questions regarding this article (Illumina Knowledge Article #8965), contact Illumina Technical Support [email protected].
For any feedback or questions regarding this article (Illumina Knowledge Article #7786), contact Illumina Technical Support [email protected].
For any feedback or questions regarding this article (Illumina Knowledge Article #3047), contact Illumina Technical Support [email protected].
This will generate a GPO report and output it to a text file in the C:\Illumina folder on the instrument.
Check the text file. If the report lists INFO: The user does not have RSoP data then force a Group Policy update by typing gpupdate /force in the console window, then repeat Step 2.
For any feedback or questions regarding this article (Illumina Knowledge Article #2273), contact Illumina Technical Support [email protected].
For any feedback or questions regarding this article (Illumina Knowledge Article #2247), contact Illumina Technical Support [email protected].
For any feedback or questions regarding this article (Illumina Knowledge Article #6342), contact Illumina Technical Support [email protected].


For any feedback or questions regarding this article (Illumina Knowledge Article #3631), contact Illumina Technical Support .
Between MiSeq and MiniSeq/NextSeq 500/550 platforms
The MiniSeq and NextSeq 500/550 platforms require significantly lower cluster densities than the MiSeq platform. Therefore, it is important to redo cluster density optimization when migrating a library from MiSeq to MiniSeq or NextSeq 500/550 platform and vice versa.
From iSeq 100 to NovaSeq 6000
Prior to performing in-depth sequencing of the library on the NovaSeq 6000 system, shallow sequencing on the iSeq 100 can provide a rapid and cost-saving quality check; refer to the Sequencing Library QC with the iSeq System application note and Step-by-step instructions for sequencing library QC with the iSeq 100 System support bulletin. When quantifying the library before sequencing on NovaSeq 6000, rebalancing the library pool based on the actual iSeq 100 reads is as consistent as using the qPCR data.
Optimize loading concentration based on the run’s percent occupancy and the percent pass filter; refer to the Plotting %Occupied by %PF to optimize loading for the NovaSeq 6000 and X, MiSeq i100, and iSeq 100 Illumina Knowledge Article. The percentage of duplicate metrics from the secondary analysis also help optimize the loading concentration; refer to the .
From NovaSeq 6000 to NovaSeq X Series
For transitioning projects from the NovaSeq 6000 System to the NovaSeq X Series, center titrations at ~30% of the NovaSeq 6000 System loading concentration for the standard onboard clustering workflow. See Maximizing performance on the NovaSeq X Series for more information.
From MiSeq to MiSeq i100
For transitioning projects from the original MiSeq System using the MiSeq Reagent Kit v3 to the MiSeq i100 Series, center titrations at ~6.5× the MiSeq Reagent Kit v3 loading concentration.
Recommended center point concentrations vary for different library preparation kits for use with the MiSeq i100 Series, see Maximizing performance on the MiSeq i100 Series (Table 1). For all other cases, it is recommended to use 100 pM for the center point concentration.
For additional information, see Knowledge Article for additional detail.
For further guidance on library loading concentrations across Illumina systems, refer to the PhiX loading concentrations for validation runs on Illumina sequencing platforms article.
For any feedback or questions regarding this article (Illumina Knowledge Article #1509), contact Illumina Technical Support .
| Platform | PhiX Aligned (%)† | | iSeq 100 | Minimum 5% | | MiniSeq | 10-50%* | | MiSeq (MCS 2.2 or higher) | Minimum 5% | | MiSeq i100 Series | Minimum 5% | | NextSeq 500/550 | 10-50%* | | NextSeq 1000/2000 | 10-50%** | | NovaSeq 6000 | Minimum 5% | | NovaSeq X Series (Control Software version ≤ 1.2) | 10-20% | | NovaSeq X Series (Control Software version 1.3) | Minimum 5% |
† Differences in clustering efficiency between PhiX and the sample library can affect the PhiX spike-in percentage required to achieve the above-targeted percent PhiX aligned. For example, more PhiX may be required if the sample library clusters more efficiently than PhiX. Contact Technical Support at [email protected] with any questions about your particular library and platform.
*PhiX can be further adjusted based on experimentation. Illumina recommends starting with higher spike-in percentages and reducing based on run performance.
** For low diversity libraries using NextSeq 1000/2000 Standard P1 and P2 600 cycle kits, at least 32% of reads should align to PhiX for optimal performance. Illumina recommends spiking in 40% to account for potential variation in final % read alignment metric. Depending on the type of low diversity library, this may be reduced after optimization. With XLEAP-SBS 600 cycle kits, there is higher performance when compared to the Standard long read kits, especially at the end of the reads. The below XLEAP results are based on testing performed with P2 XLEAP-SBS 600 cycle kits.
Frequently Asked Questions:
Can the PhiX Control v3 Library provide improved nucleotide diversity for low diversity index sequences?
No, the PhiX Control v3 Library is unindexed and does not balance signals ing index reads.
Are there other considerations when sequencing low diversity libraries?
Yes. Reduce the library loading concentration to target a cluster density 30-40% below the optimal range for the chemistry version and platform used. The optimal amount of reduction required must be empirically determined. For more information, refer to the following resources. - -
For any feedback or questions regarding this article (Illumina Knowledge Article #1527), contact Illumina Technical Support .
The system uses a patterned flow cell with nanowells (Figure 3) with 4 different flow cell options which allow the NovaSeq output to scale to different applications and throughput levels.
Clustering and sequencing occur in the nanowells with a proprietary ExAmp chemistry to ensure that each well in the flow cell generates a single clonal cluster.
Figure 3: Schematic representation of NovaSeq 6000 flow cell and the nanowells.
The NovaSeq Flow Cell specifications are further detailed in the table below.
For more information, see the Sequencing by Synthesis page here and the NovaSeq 6000 Sequencing System Guide here.
For any feedback or questions regarding this article (Illumina Knowledge Article #8435), contact Illumina Technical Support .


In the Windows Search bar, input Credential Manager and then select the Credential Manager application (Figure 1).
Select Windows Credentials (Figure 2).
Under the Windows Credentials header, locate the mapped network storage connection, then click the down arrow to expand the selection (Figure 3).
Select Edit (Figure 3).
In the User name and Password text boxes, input the updated network credentials as necessary (Figure 4).
Select Save.
Close the Windows Credential Manager application.
Power cycle the instrument to refresh the mapped network connection.
Figure 1: Credential Manager application in the Windows Search menu.
Figure 2: Windows Credential tab with the Windows Credentials header showing the mapped network drive.
Figure 3: The down arrow used to expand the selection and the Edit button to update the credentials.
Figure 4: The Edit Windows credential user interface (UI) showing the User name and Password text boxes.
For any feedback or questions regarding this article (Illumina Knowledge Article #10020), contact Illumina Technical Support .
Upon return to work:
Plug the power cord back and turn the instrument on.
Perform two maintenance/manual washes to rehydrate the fluidics system.
Perform a system check following the instrument system guide.
If system checks fail or any other errors are observed, contact Illumina Technical Support.
For any feedback or questions regarding this article (Illumina Knowledge Article #3018), contact Illumina Technical Support .
Extensively clean equipment and surfaces that have been in contact with the ammonia-based cleaners. To clean, use an anionic detergent such as 1% SDS or diluted dish soap, followed by water.
Use pipettes that have not been in contact with ammonia-based cleaners when setting up clustering and/or sequencing runs.
Additional Resources:
For any feedback or questions regarding this article (Illumina Knowledge Article #1846), contact Illumina Technical Support .
Indexed samples from applications that are more diverse, such as human amplicon sequencing, enrichment, or whole-genome sequencing, can be used to balance diversity.
For best results, sequence multiple samples on the same flow cell using single- or dual-indexing.
Spike-in PhiX control V3 Library to the run.
A good starting point is to use 50% PhiX and then titrate the amount down, based on the quality of the primary and secondary analysis results. The presence of the spiked-in sample provides the necessary cycle-to-cycle base diversity.
Aim to target a cluster density 30-40% beneath the recommended cluster density range for balanced libraries (such as PhiX) on NextSeq and MiniSeq systems.
MiniSeq reagents accommodate an optimal raw cluster density of 170-220 K/mm2 for balanced libraries
NextSeq 500/550 reagents accommodate an optimal raw cluster density of 170-220 K/mm2 for balanced libraries
The design recommendations in this bulletin enable the NextSeq 500/550 and MiniSeq systems to sequence low diversity libraries.
For any feedback or questions regarding this article (Illumina Knowledge Article #2882), contact Illumina Technical Support .
RunParameters.xml
For specific details on where these files and folder are located on different Illumina sequencers, refer to one of the File Path articles listed below:
MiniSeq (for Control Software or )
For any feedback or questions regarding this article (Illumina Knowledge Article #3234), contact Illumina Technical Support .
For any feedback or questions regarding this article (Illumina Knowledge Article #5858), contact Illumina Technical Support [email protected].
For any feedback or questions regarding this article (Illumina Knowledge Article #5788), contact Illumina Technical Support [email protected].
For any feedback or questions regarding this article (Illumina Knowledge Article #7985), contact Illumina Technical Support [email protected].
For any feedback or questions regarding this article (Illumina Knowledge Article #7983), contact Illumina Technical Support [email protected].
For any feedback or questions regarding this article (Illumina Knowledge Article #5789), contact Illumina Technical Support [email protected].
Illumina has Illumina Solution Centers world-wide, and offers end-to-end trainings for both sequencing and microarray workflows.
The interactive catalog here reviews the complete catalog of Illumina's End-to-End Service and Support Solutions offerings along with information on how to request trainings at Illumina Solutions Centers in the Americas. This content can also be viewed by scanning the QR code below.
For any feedback or questions regarding this article (Illumina Knowledge Article #8977), contact Illumina Technical Support .
Analyses for runs using a v1 sample sheet can be requeued through the BaseSpace Sequence Hub (BSSH) Web Interface the majority of the time. Instruments that typically use a v1 sample sheet include the iSeq 100, MiniSeq (updated to Control Software 2 and Windows 10), MiSeq, HiSeq 1000/1500/2000/2500, NextSeq 500/550 (updated to NextSeq 500/550 Control Software 4 and Windows 10), and NovaSeq 6000. Illumina recommends using the Local Run Manager software to create sample sheets, as it guides users through the process and will check for errors.
In some instances, an analysis errors out due to communications issues on BaseSpace. If an analysis needs to be requeued using the same sample sheet, follow the instructions below.
Note: Runs that use a v2 sample sheet (for example the NextSeq 1000/2000) must be requeued with the BCL Convert app on BaseSpace and cannot be requeued through the method described below.
Important Notes:
MiniSeq and NextSeq 500/550 runs set up using the BaseSpace Sequence Hub PrepTab require different steps to edit run setup and .
Only the owner of the run can requeue an analysis. It is possible to of a run, if necessary. A does not provide the necessary permissions needed to requeue analysis.
There is a limit of five requeue attempts for users of BaseSpace Sequence Hub. If assistance with additional requeues is needed, email and share the run ID and sample sheet. To find the run ID, open the run in BaseSpace, and look in the web browser address bar for the numerical value after:
To requeue the analysis using the same sample sheet:
After logging in to the BaseSpace account, select the RUNS tab at the top of the page.
Select the blue hyperlink of the run to requeue.
Select the hourglass icon below the run name, then REQUEUE > SAMPLE SHEET.
The sample sheet may be pre-populated in the editing window. If not, select 'Load Original' to load the sample sheet.
Once the sample sheet has been validated, select the blue Queue Analysis button.
If the Queue Analysis button is not active, check for and resolve any validation errors.
The status on the run summary page will display "Analyzing" when the analysis is ongoing and will change to "Complete" when the requeued analysis is complete.
If reformatting of the sample sheet is required prior to requeueing the analysis, search for Knowledge Base article How to edit a sample sheet and requeue an analysis in BaseSpace Sequence Hub.
Illumina Product Support Services Plans help maximize performance and productivity with reliable, high-quality results at various cost-effective levels.
A standard 1-year base warranty is included with every new Illumina instrument purchase, along with installation* and basic applications trainings. Illumina also offers several tiered Service Plans to upgrade the base warranty to an enhanced service level or extend service coverage beyond the 1-year warranty.
1-Year Base Warranty
Instrument repair parts, labor, and travel.
5 business day on-site response time target.
Reagent replacement due to instrument failures.
Hardware and Control Software updates.
Applications support.
5 × 8 phone and email access to Technical Support (8 hours per day, Monday to Friday).
Bronze
Instrument repair parts, labor, and travel.
3 business day on-site response time target.
No reagents replacements due to instrument failures.
Silver
Instrument repair parts, labor, and travel.
2 business day on-site response time target.
Reagent replacements due to instrument failures.
Gold
Instrument repair parts, labor, and travel.
Next business day on-site response time target.
Reagent replacements due to instrument failures.
See for more information. * The MiSeq i100 Series and iSeq 100 are customer-installed in some Regions.
Ensuring that sufficient volumes of SBS reagents are loaded onto the sequencing instrument is crucial for a successful run. Running out of reagents during a run impacts intensity and quality metrics, and can result in total run failure.
Dual-index sequencing follows different workflows depending on the instrument, as shown in the Indexed Sequencing Overview Guide. On certain instruments, dual-index runs require an additional seven cycles of reagents for the chemistry-only cycles at the beginning of the second Index Read. The seven chemistry-only cycles are required for the workflows in which the second Index Read sequencing occurs after the forward template anneals to the grafted P5 primer on the surface of the flow cell. These seven cycles must be considered when calculating the number of cycles supported by the kit.
The following table outlines available reagent kit sizes and the maximum number of cycles each kit can perform, taking the additional seven cycles into consideration when necessary:
*The NextSeq 1000/2000 P2 v3 300 cycle kit has 338 total cycles while the P3 v3 300 cycle kit has 327 total cycles.
**All the NextSeq 1000/2000 XLEAP kits have 38 extra cycles.
For details on maximum supported cycles in each read, refer to the article .
Summary A remote code execution vulnerability exists when the Windows Print Spooler service improperly performs privileged file operations. An attacker who successfully exploits this vulnerability could run arbitrary code with SYSTEM privileges. An attacker could then install programs; view, change, or delete data; or create accounts with full user rights.
Illumina recommends that customers immediately disable their printer spooler service using the instructions in the Workaround section below.
As of July 7, 2021, the security updates for Windows Server 2012, Windows Server 2016, and Windows 10, Version 1607 have been released. Refer to the Security Updates table in CVE-2021-34527 for the update applicable to your system.
Microsoft has released security updates to address this vulnerability. Illumina is evaluating the impact of the official Microsoft patches on the performance of Illumina Windows-based products. Until that impact testing is complete, Illumina recommends that customers immediately disable their printer spooler service (see Workaround section below).
Note: The security updates released on and after July 6, 2021 contain protections for CVE-2021-1675 and protections for an additional remote code execution exploit in the Windows Print Spooler service known as “PrintNightmare”, documented in .
Workaround
Before checking/changing the Print Spooler service, check to ensure registry keys do not exist (registry keys do not exist by default and if they are not present, they are already at the secure setting) or, if they are present, they are set to “safe”:* If the following registry keys are present, confirm they are set to 0 (zero) and that your Group Policy settings are correct and have not altered the settings (see FAQ ):
In the registry editor, navigate to: KEY_LOCAL_MACHINE > SOFTWARE > Policies > Microsoft > Windows NT > Printers > PointAndPrint
If Printers > PointAndPrint is present, ensure the following are the settings: - NoWarningNoElevationOnInstall = 0 (DWORD) or not defined (default setting) - UpdatePromptSettings = 0 (DWORD) or not defined (default setting)
Note: Having NoWarningNoElevationOnInstall set to 1, by design, makes your system vulnerable to attack.
Determine if the Print Spooler service is running:
Run the following in Windows Powershell: Get-Service -Name Spooler
If the Print Spooler is running or if the service is not set to disabled, select one of the following options to either disable the Print Spooler service, or disable inbound remote printing through Group Policy:
Option 1 - Disable the Print Spooler service
If disabling the Print Spooler service is appropriate for your enterprise, use one of the following PowerShell commands: - Stop-Service -Name Spooler -Force - Set-Service -Name Spooler -StartupType Disabled
Impact of workaround: Disabling the Print Spooler service disables the ability to print both locally and remotely.
Option 2 - Disable inbound remote printing through Group Policy
Configure the settings via Group Policy as follows: - Navigate to: Computer Configuration > Administrative Templates > Printers - Disable the “Allow Print Spooler to accept client connections:” policy to block remote attacks. - You must restart the Print Spooler service for the group policy to take effect.
Impact of workaround: This policy will block the remote attack vector by preventing inbound remote printing operations. The system will no longer function as a print server, but local printing to a directly attached device will still be possible.
For more information, refer to .
Refer to the FAQ and Workaround sections in the Microsoft Common Vulnerabilities and Exposures (CVE) for more information on how to help protect your system from this vulnerability until the patch can be tested. See also .
For additional questions, contact [email protected].
簇密度是决定测序中能否获得最佳的测序质量和数据量的重要因素。下表是根据平衡文库(例如phix 文库)的结果,列出的各平台原始簇密度推荐值:
测序平台
模式/试剂
原始簇密度理想值
MiSeq
v2
1000-1200 K/mm2
v3
1200-1400 K/mm2
其中iSeq 100, MiSeq i100系列, NextSeq 1000/2000, NovaSeq 6000, NovaSeq X 系列测序平台使用的Flow Cell为Pattern Flow Cell, 这种类型的Flow Cell即使是上面所有纳米孔都没有成簇,簇密度也都为同一固定值。在使用这些平台时可以通过Cluster PF(%)对Cluster Occupancy做出初步的判断。
详情请参阅以下资料:
A PhiX validation run confirms proper hardware and software performance of the instrument. The Illumina PhiX control library is a well-balanced genome with relatively equal representation of A, T, G, and C nucleotides. PhiX lacks an index and is not an appropriate tool for assessing Index Read performance.
PhiX validation runs can be set up with Local Run Manager on instruments with the Local Run Manager software suite bundled for on-instrument use. These instruments are the iSeq 100; MiSeq with MiSeq Control Software v3 and v4; NextSeq 500/550 with Control Software v4; and MiniSeq. Note that MiniSeq instruments with MiniSeq Control Software v1 have Local Run Manager v1.3, while MiniSeq instruments with Control Software v2 have Local Run Manager v2. Instruments running MiSeq Control Software v3 have Local Run Manager v2 and MiSeq Control Software v4 has Local Run Manager v3.
Launch the Chromium browser and enter http://localhost in the address bar. If User Management is enabled in Local Run Manager v2 or v3, the login page will appear, requiring you to enter the user ID and password. If User Management is disabled, the dashboard will appear. Version 1.3 of Local Run Manager for MiniSeq always requires a login.
Select Create Run and choose Generate FastQ from the drop-down list.
Enter the following values in the highlighted fields:
Run Name: PhiX validation run
Library Prep Kit: Custom
Index Reads: 0 (Note: PhiX is unindexed and selecting 1 or 2 Index reads can cause the run to terminate prematurely)
Keep default values in the Module-Specific Settings field.
Scroll to the bottom of the Create Run page. In the Import Samples table, type PhiX in the Sample ID field.
Select Save Run.
The run time specifications for Illumina sequencing runs include cluster generation, SBS chemistry cycles, paired-end chemistry, and wash steps. In addition, runs that use non-patterned flow cells pause for a template building step. To aid in planning sequencing workflows and in estimating overall run times, Table 1 summarizes the estimated length of each sequencing step for Illumina sequencing platforms and chemistry versions.
Table 1. Approximate times for each sequencing step per instrument and supported chemistry
* Template building time will vary based on cluster density ¤ XP workflow is approximately 150 minutes as ExAmp step is skipped
**Purge time varies based on the number of cycles
Estimated run times will depend on cluster density and available computer resources. If the hard drive does not have sufficient space for data processing, or network location speeds are slow, run times may be prolonged. Total run times for the maximum read lengths of Illumina platforms, and other sequencing run specifications, can be found on the web page.
The Internet Protocol (IP) and Media Access Control (MAC) addresses for an instrument are often used by IT/Networking teams to identify an instrument on the network and assign special security permissions. These will be unique for each Network Interface Card (NIC) on the instrument. Most Illumina instruments have 2-3 NICs available, generally one for external connections to a network and another for the instrument's internal connections.
To identify the IP or MAC addresses of a particular instrument, use the Command Line in Windows or the Terminal in Linux.
**In Windows Operating System (OS) Environments:**1. In the search bar in the bottom left corner, type in cmd and then press enter to open the Command Line interface.
2. In the Command Line, type in ipconfig /all and press enter.
3. The printout will display the IPv4 and Physical Address for each NIC, which are the IP and MAC addresses, respectively.
Many instruments will have internal and external-facing NICs; do not modify or alter the settings for the internal-facing NIC.
In Linux OS Environments:
On the Linux desktop, right-click and select 'Open Terminal'.
In the Terminal window, type ifconfig and press Enter.
The printout will display the configuration settings for each NIC on the instrument.
inet = IPv4 Address
ether = MAC address
For the NextSeq 1000/2000 platforms, there are the following NICs:
Enp2s0: Recommended external NIC
Enp5s0: Internal NIC
Enp6s0: Alternate external NIC
General antivirus (AV) and other Security information is available under the Antivirus Software and Configuration Guidelines section of the Illumina Product Security Guidance. The whole of this document also details general instrument control computer best practices that should be considered in addition to recommendations for AV software configurations.
To avoid data loss or interruptions, use the following guidelines to configure an antivirus software of your choice.
Configure software for manual scans and do not allow automatic scanning.
Perform manual scans only when the instrument is idle and not actively performing a sequencing run or analysis.
If possible, perform several sequencing runs with the AV software in listening or training mode to allow it to identify normal use patterns.
Set AV updates to download without user authorization, but to not install automatically.
Install updates only when the instrument is not in use and the computer can be rebooted.
Do not allow the control computer to reboot automatically after install.
Exclude the application directory and data drives from any real-time file system protection. Apply this setting to the following drive locations:
C:\Illumina
C:\ProgramData\Illumina
When deploying AV software across multiple instruments of the same model, install and configure the AV software on a subset of instruments first and monitor for any issues before expanding to additional instruments.
For more details on configuring antivirus software for your system, see the Site Prep Guide for the instrument. Contact the antivirus software vendor for software-specific instructions.
Companies/sites that use licensed copies of TeamViewer instead of TeamViewer QuickSupport can sometimes have security restrictions preventing Illumina Technical Support from connecting to their instruments via TeamViewer.
This article has instructions for adding connections from Illumina to the TeamViewer allow-list to facilitate these screen share connections.
Instructions for adding Illumina to TeamViewer allow-list:
To allow only specific TeamViewer accounts or TeamViewer IDs remote access to a device, set up an allow-list.
In the TeamViewer full version, select Extras > Options > Security > Block and Allow-list > Select Configure...
A new window will open. Activate the second option, Allow access only for the following partners, then select Add.
After selecting Add, either choose partners saved on the computers & contacts list, add a whole company (only visible if computer is part of company profile), or add TeamViewer IDs or contacts manually to the allow-list.
Select 'Manually add contact to your Allow-list' and then type ILLUMINA INC into the field.
This allows any connections from Illumina's licensed corporate account to connect to this instrument.
Background
Illumina announced the end of life (EOL) that includes the sale and support for the MiSeq RUO system, certified pre-owned MiSeq RUO system, MiniSeq system, iSeq 100 system, and associated consumables in a Product Obsolescence Notification (PON) sent to customers on 27-MAR-2025.
This PON was distributed to North, Central, and South America, Europe, Africa, Middle East, and parts of Asia.
Key Dates
EOL Announcement: 27-MAR-2025
Instrument End of Sale (EOS): 30-SEP-2025
Consumable EOS: 2H 2029 (second half of the year; specific date to be determined in 2029)
Final EOL: 31-DEC-2029
Important Dates about Service Contracts
New or lapsed Service Contracts must be renewed by EOS on 30-SEP-2025.
Instruments that are OFF contract after this date will NOT be eligible for renewal.
If a Service Contract is not renewed each year between EOS on 30-SEP-2025 and EOL on 31-DEC-2029, the user will NOT be able to purchase a new Service Contract.
For questions about service contracts, see the page.
Note about replacement parts, hardware, and consumables
Illumina will provide a best effort to provide spare or replacement parts for hardware until 31-DEC-2029, though Illumina cannot guarantee availability or lead times for parts or Advanced Exchange units.
Certain reagent kits may be discontinued earlier than the second half of 2029 if demand remains low.
Contact to request the full Product Obsolescence Notification and FAQs.
In some cases, new index kit offerings will be made available for existing library preparation kits. Index kit files (pre-existing index kit files) can be added to existing Library Prep kit options in Local Run Manager. Use the steps below to import a pre-existing index kit into Local Run Manager (LRM) v3 or v4.
Save the desired index kit locally on the instrument.
Open Local Run Manager by navigating to https://localhost/#/ via the Chromium Web Browser on the instrument.
Select Tools.
Select Index & Library Prep Kits.
Select the tab for Index Kit.
Select Add Index Kit on the right-hand side.
Browse to the index kit saved on the instrument and select Open.
For information on creating a custom library prep kits/index kits to import into Local Run Manager v3 and v4, see Knowledge article.
If additional assistance is needed, .
In this video, we discuss IT requirements for implementing Illumina Proactive, an instrument performance monitoring service provided by Illumina that can increase instrument uptime, improve operational efficiency, and reduce the risk of lost resources.
Learn more about Illumina Proactive here.
<
Video length: 4:07 min
For any feedback or questions regarding this article (Illumina Knowledge Article #5749), contact Illumina Technical Support .
Illumina Advantage (IA, formerly TG Translational Genomics) large-scale sequencing products feature lot-specific shipments and testing, extended shelf life, and advanced change notifications for greater laboratory efficiency.
For more information, see the Support Page.
For any feedback or questions regarding this article (Illumina Knowledge Article #5173), contact Illumina Technical Support .
This support webinar video is ideal for users interested in considerations for the sequencing of low diversity libraries. The video discusses the following topics: understanding and visualizing base diversity in Sequencing Analysis Viewer (SAV), strategies to optimize low diversity sequencing data, % PhiX spike-in and cluster density recommendations for different sequencing platforms, and an overview of base calling and quality score calculations.
<
Video length: 35:54 min
For any feedback or questions regarding this article (Illumina Knowledge Article #7984), contact Illumina Technical Support .
The country of origin and date of manufacture of Illumina instruments are printed on the label placed on the back of the instrument.
For any feedback or questions regarding this article (Illumina Knowledge Article #8548), contact Illumina Technical Support .
iSeq 100
No cleaning required.
Only touch the plastic when handling the flow cell.
Avoid touching the electrical interface, CMOS sensor, glass, and gaskets on either side of the glass.
Proper maintenance of the instrument computer minimizes computer-related issues during sequencing runs. The following tips help maintain the instrument computer. How often these maintenance steps are recommended is dependent on the usage of the instrument.
Power cycle the computer and instrument
Power cycling resets the instrument computer, memory usage, and software programs. A power cycle consists of shutting down the instrument and computer, leaving the system off for two to five minutes, then restarting the instrument and computer. The instrument contain recommendations for properly power cycling.
Instruments should be left on at all times when not being power cycled to maintain the integrity of the instrument fluidics.
The Local Run Manager software is an integrated solution for recording samples for a run, specifying run parameters, monitoring run status, performing data analysis, and viewing results. Important note: The directions in this Knowledge article apply to Local Run Manager versions up to 4.X
This article describes how to requeue analysis for a run in Local Run Manager with the same module, and how to import data to analyze with a new module.
To requeue with the same module:
From the Local Run Manager dashboard, select Actions next to the run you wish to requeue. Select Requeue.
At the beginning of Read 1 on the MiniSeq and NextSeq 500/550, the instrument determines the best Z position (distance between the objectives and flow cell) where the clusters are well-focused. During this process, the instrument takes and saves a series of Focus Images.
Many of the images are black with a laser dot and contain in the file name nomenclature, "Laser_AF_zpos... method_AutoFocus". These images are laser only and thus clusters are not excited and not seen.
However, some focus images show clusters and have in the file name nomenclature, "Red_IM_zpos... method_AutoFocus_BestFocus". These images show visible clusters when the Z position is correct, allowing for proper focus of the clusters on the flow cell.
Technical Support can evaluate Focus Images to diagnose clustering issues (failed to cluster/ underclustering and overclustering) or an unstable focus model.
Determining the number of reads passing filter (READS PF) is critical for evaluating the overall success of a sequencing run. Here are the step-by-step instructions for determining the number of clusters passing filter for a single lane, a single read, and a run using BaseSpace Sequence Hub (BSSH) or Sequencing Analysis Viewer (SAV).
How to access READS PF in the METRICS tab
Select a run.
Below is a comparison of Illumina's Qualification Service Offerings. More information can be found at .
Provides documented verification that the instrument is installed according to our specifications and safety regulations. During the IQ, a trained engineer confirms that the latest supported firmware and software versions were installed, verifies instrument setup and accessory logistics, checks that physical and environmental safety conditions are met, and provides a signed, audit-ready, digital document.
Follows a comprehensive, well-defined protocol to make sure that the system is functioning according to our preset and validated operational specifications. The OQ protocol was developed and validated in Illumina labs and is updated after each instrument hardware and software release, so you receive the most up-to-date service. Critical aspects of the OQ include motion, optics, fluidics, and thermal qualifications.
Follows a comprehensive, well-defined protocol to make sure that the instrument is functioning according to our preset and validated performance specifications. The PQ protocol was developed and validated in Illumina labs and is updated after each instrument hardware and software release, so you receive the most up-to-date service. Critical aspects of the PQ include a PhiX data run (including projected yield total), data quality, and any additional comments.
Introduction
A next-generation sequencing experiment consists of a series of discrete steps that uniquely contribute to the overall quality of a data set. Sequencing quality metrics can provide important information about the accuracy of each step in this process, including library preparation, base calling, read alignment, and variant calling. Base calling accuracy, measured by the Phred quality score (Q score), is the most common metric used to assess the accuracy of a sequencing platform. It indicates the probability that a given base is called incorrectly by the sequencer. Historically used to determine Sanger sequencing accuracy, Phred originated as an algorithmic approach that considered Sanger sequencing metrics, such as peak resolution and shape, and linked them to known sequence accuracy through large multivariate lookup tables. This method proved to be highly accurate across a range of sequencing chemistries and instruments, making it the quality scoring standard for commercial sequencing technologies. While next-generation sequencing metrics vary from those of Sanger sequencing (e.g., no electropherogram peak heights), the process of generating a Phred quality scoring scheme is largely the same. Parameters relevant to a particular sequencing chemistry are analyzed for a large empirical data set of known accuracy. The resulting quality score lookup tables are used to calculate a quality score for de novo next-generation sequencing data (in real time on Illumina platforms), possessing an equivalent meaning to the historical metrics familiar to most Sanger sequencing users.
Calculating Phred Quality Scores
IntroductionThe latest innovation in flow cell technology is the development of the patterned flow cell. Five Illumina sequencing platforms currently take advantage of this advanced technology: the iSeq 100, NextSeq 1000/NextSeq 2000, HiSeq 3000/HiSeq 4000, HiSeq X and NovaSeq 6000 System. Patterned flow cells consist of a nano well substrate with billions of ordered wells (Figure 1A). Compared to nonpatterned flow cells (Figure 1B), the uniform cluster sizes enable optima spacing and increased cluster density. Although the ordered spacing of patterned flow cells enables significantly higher cluster density, 2-4, patterned flow cells also report comparatively lower percent passing filter (%PF)* values due to differences in the %PF calculation method. This technical note outlines these differences and describes how they lead to lower %PF metrics for patterned flow cells.
Percent Passing Filter with Nonpatterned Flow Cells
In brief, Real-Time Analysis software proceeds through several stages including image analysis, template generation, base calling, passing filter calculations, and quality scoring. Template generation occurs during cycles 1-5 of Read 1 and defines the position of each cluster in a tile. The template is used as a reference for registration and intensity extraction during subsequent sequencing cycles. With nonpatterned flow cells, dim or low-quality clusters are removed from the raw cluster count during template generation (Figure 2). This effectively acts as a prefiltration step, removing clusters unlikely to pass filter in the first 25 sequencing cycles and yielding relatively high %PF values.
On December 10, 2021, Illumina was made aware of a vulnerability in the Apache Log4j software suite (CVE-2021-44228, CVE-2021-45046, and CVE-2021-44832). This software component is a Java-based logging utility and part of the Apache Logging Services Foundation products.
After Illumina became aware of the issue, we launched an investigation to identify potentially affected products and assess risk and have the following update:
The scope of products currently evaluated:
iSeq 100
Illumina平台和测序试剂盒支持多种 。 为了保证最高水平的测序质量,Illumina不同测序平台以及不同的SBS试剂盒版本支持的最大读长有所不同,相关信息请参阅 技术文档。利用本地运行管理软件( )或仪器控制软件(Control Software)设置测序运行时,可以选择更长的读长。但是当read长度超过支持的长度时,Illumina将无法保证较高的数据质量。
表 1. 测序平台和SBS试剂盒支持的最大读长
* MO: 中通量 / HO: 高通量
Index Reads的最大读长
Cluster density is an important factor in optimizing data quality and yield. The following table lists the recommended raw cluster densities for balanced libraries (such as PhiX):
The iSeq 100, MiSeq i100, NextSeq 1000/NextSeq 2000, NovaSeq 6000, and NovaSeq X systems utilize patterned flow cells, which result in a fixed cluster density, even if all nanowells are not occupied. In these systems, monitoring the Cluster PF (%) is a better measure of potential cluster occupancy.
See the following for further details:
The Universal Naming Convention (UNC) is a standard for identifying servers, printers, and other resources on a network. A UNC network path has the following format:
\servername\share\path
Illumina recommends using the UNC path when setting a network server as the default output location and is a requirement for most Illumina platforms running Windows 10. Use the following steps to identify the UNC path for an existing mapped network location in Windows:
In the Windows Search bar, type in cmd and press 'Enter' to open the Command Prompt.
该技术文档提供的信息,能够帮助您计算Illumina测序反应废液中甲酰胺的终浓度。
每个测序反应废液中甲酰胺的浓度会基于测序平台和测序长度而有所差异。您可以根据下表的说明,测量废液的总体积,并计算甲酰胺的终浓度。
*由于iSeq100试剂槽不能打开,因此它是以固体废弃物处理。
**如果剩余甲酰胺没有排入废液中,基于不同测序长度甲酰胺的浓度范围为0.35-1.5%
NovaSeq X/X Plus
Illumina NGS (Next Generation Sequencing) platforms require a post-run wash and/or maintenance wash to be performed with regularity (refer to the appropriate instrument guide for details). To avoid contaminating the fluidics lines during these washes, Illumina recommends following these best practices.
After removing the wash cartridge from the instrument, properly discard any remaining wash solution (eg, do not reuse the Tween wash solution).
Thoroughly rinse each position of the wash cartridge with lab-grade warm water.
This video discusses what to expect during the pre-installation, shipping, and delivery stages of instrument delivery. It also highlights important steps in the process and introduces available resources.
<
Video length: 7:13 min
Note: Depending on the region, the steps shown in this video may not apply to the iSeq 100 System.
This video shows how to clean and maintain wash cartridges/trays for Illumina sequencers to prevent contamination.
<
Video length: 4:41 min
For any feedback or questions regarding this article (Illumina Knowledge Article #2222), contact Illumina Technical Support [email protected].
D:\Output (NextSeq 500/550 and MiniSeq)
Z:\outputfolder (NovaSeq 6000 only)
/usr/local/illumina/images AND /usr/loca/illumina/runs (NextSeq1000/2000)
See the instrument Site Prep Guide for instrument specific details.
For any feedback or questions regarding this article (Illumina Knowledge Article #2278), contact Illumina Technical Support [email protected].
For any feedback or questions regarding this article (Illumina Knowledge Article #3777), contact Illumina Technical Support [email protected].
For any feedback or questions regarding this article (Illumina Knowledge Article #7489), contact Illumina Technical Support [email protected].
MiniSeq
Mid and High Output
170-220 K/mm2
NextSeq 500/550
Mid and High Output
170-220 K/mm2
For any feedback or questions regarding this article (Illumina Knowledge Article #7415), contact Illumina Technical Support [email protected].
Service Contracts renewed AFTER 31-DEC-2028 will still end 31-DEC-2029, with Service Contracts being prorated for shortened service period.
For any feedback or questions regarding this article (Illumina Knowledge Article #9536), contact Illumina Technical Support [email protected].
For any feedback or questions regarding this article (Illumina Knowledge Article #8929), contact Illumina Technical Support [email protected].

For any feedback or questions regarding this article (Illumina Knowledge Article #8380), contact Illumina Technical Support [email protected].


Hardware and Control Software updates.
5 × 8 phone and email access to Technical Support (8 hours per day, Monday to Friday).
Applications support.
Hardware and Control Software updates.
5 × 18 phone and email access to Technical Support (18 hours per day, Monday through Friday).
1 Operational Qualification (OQ) at Preventive Maintenance visit and after a qualified repair.
Applications support.
Hardware and Control Software updates.
5 × 24 phone and email access to Technical Support.
For any feedback or questions regarding this article (Illumina Knowledge Article #3016), contact Illumina Technical Support [email protected].

For any feedback or questions regarding this article (Illumina Knowledge Article #7002), contact Illumina Technical Support [email protected].

For any feedback or questions regarding this article (Illumina Knowledge Article #1540), contact Illumina Technical Support [email protected].


Read Length: Enter at least 26 cycles for each read (or follow Illumina Support guidance on the number of cycles for each read)
Select the Local Run Manager run setup option and then select ‘PhiX validation run’ from the list of available runs and proceed to sequencing.
For any feedback or questions regarding this article (Illumina Knowledge Article #1318), contact Illumina Technical Support [email protected].


Reference: iSeq 100 Sequencing System Product Documentation.
MiniSeq
Put on a new pair of powder-free gloves.
Remove the flow cell from the container.
Clean the glass surface of the flow cell with a lint-free alcohol wipe.
Dry with a lint-free lens cleaning tissue. Use care around the black flow cell gasket.
Inspect the flow cell port for obstructions. Make sure that the gasket is well-seated.
Reference: .
MiSeq
Put on a new pair of powder-free gloves.
Remove the flow cell from the container.
Lightly rinse the flow cell with laboratory grade water until both the glass and the plastic cartridge are thoroughly rinsed of excess salts.
Using care around the black flow cell port gasket, thoroughly dry the flow cell glass and plastic with a lint-free lens cleaning tissue. Gently pat dry in the area of the gasket and adjacent glass.
Clean the flow cell glass with an alcohol wipe. Make sure that the glass is free of streaks, fingerprints, and lint or tissue fibres.
DO NOT USE THE ALCOHOL WIPE ON THE FLOW CELL PORT GASKET.
Dry excess alcohol with a lint-free lens cleaning tissue.
Inspect the flow cell port for obstructions. Make sure that the gasket is well-seated. If the gasket appears to be dislodged, gently press it back until it sits securely around the flow cell ports.
Reference: and .
NextSeq 500/550
Remove the flow cell from the foil packaging.
Open the clear plastic clamshell package and remove the flow cell.
Clean the glass surface of the flow cell with a lint-free alcohol wipe. Dry the glass with a low-lint lab tissue.
Reference:
NextSeq 1000/2000
The flow cell MUST NOT be cleaned.
Flow cells can look streaky; they are fine to use.
Reference NextSeq 1000/2000 Product Documentation.
NovaSeq 6000
It is not necessary to clean the flow cell.
If desired, clean the glass surface of the flow cell with a lint-free alcohol wipe. Dry the glass with a low-lint lab tissue.
Reference: NovaSeq 6000 Sequencing System Guide.
NovaSeq X Series
Put on a new pair of powder-free gloves to avoid contaminating the glass surface of the flow cell.
With the flow cell foil package over a flat surface, peel open the foil from the corner tab
Remove the flow cell from the package. Grasp the flow cell by the sides to avoid touching the glass or the underside gaskets.
Always clean the flow cell, whether or not a contaminant is present, using the following steps:
Wet a Contec Polynit Heatseal wipe with isopropyl alcohol (70%).
Gently clean the applicable surface. Wipe in a lengthwise direction (top to bottom direction) only, avoiding gaskets and manifolds.
Repeat steps a and b until surfaces are clear.
Do NOT use other lint-free wipes such as Kim Wipes or similar products. Only use Contec Polynit Heatseal wipes.
Always use isopropyl alcohol over ethanol due to higher purity.
Reference: .
MiSeq i100
No cleaning required (CMOS patterned flow cell integrated into the Dry cartridge).
Cartridge should be gripped from the side to avoid touching the flowcell circuit/CMOS sensor.
Reference: MiSeq i100 Plus System.
For any feedback or questions regarding this article (Illumina Knowledge Article #5147), contact Illumina Technical Support .
Power cycling the instrument computer regularly can maintain consistent instrument computer performance.
You may be asked to power cycle the instrument during troubleshooting.
The instrument system guides contain recommendations for properly shutting down the instrument and computer for extended periods of time.
Cleaning the hard drives
iSeq 100
Temporary run folders, or “temp folders”, are not deleted by default on the iSeq 100. Without removal, old run folders will reduce hard drive space. The temp folders (D:\Illumina\iSeq Runs) can be managed by deleting the run via Process Management in the control software. Runs in the default output folder on the instrument (D:\SequencingRuns) can only be deleted via the file explorer.
MiniSeq
Temp run folders are not deleted by default on the MiniSeq. Without removal, old run folders will reduce hard drive space. Local Run Manager can be configured for automated deletion of analysis folders, and folder retention time is configured in the Local Run Manager System Settings. Otherwise, run folders require manual deletion.
MiSeq
The hard drive on the MiSeq is configured for processing runs and performing on-instrument analyses and is not meant for long-term storage. Data within the MiSeqTemp folder is automatically cleared after 7 days. It is good practice to move old run folders from the MiSeqAnalysis and MiSeqOutput folders to long-term storage regularly.
MiSeq i100 Series
The MiSeq i100 Series instruments run in Kiosk Mode to prevent unauthorized users from accessing the operating system. MiSeq i100 Series run folders are not automatically deleted. If there is insufficient data storage space, a warning notification displays during pre-run checks. Regularly deleting run folders is recommended. See Run Management for instructions to delete runs.
NextSeq 500/550
With NextSeq Control Software v2The NextSeq hard drive is designed to store data for one run, which will be automatically overwritten when a new run is started.
With NextSeq Control Software v4The NextSeq hard drive can store multiple runs, but it is recommended to use an output folder in a network location. The data in the temp folder is automatically overwritten when a new run is started. Output folders on the instrument require manual deletion.
NovaSeq 6000
NovaSeq 6000 temp run folders are not automatically deleted. Without removal, hard drive space can become limited, which can impact data processing. Regularly deleting run folders is recommended. Delete runs from the temp folders via Process Management in the control software.
NextSeq 1000/2000
NextSeq 1000/2000 run folders are not automatically deleted. Without removal, hard drive space can become limited, which can impact data processing. Regularly deleting run folders is recommended. Delete runs from the temp folders via Disk Management in the control software. Deleting runs manually via the file navigation system can negatively impact the control software.
NovaSeq X Series
NovaSeq X Series run folders are not automatically deleted. If there is insufficient data storage space, a warning notification displays during pre-run checks. Regularly deleting run folders is recommended. See Clear Hard Drive Space for instructions to delete runs. Deleting runs manually via the file navigation system can negatively impact the control software.
Security best practice
The Illumina Security and Networking web page contains recommendations for security configurations on all Illumina sequencing platforms. Further platform-specific recommendations are found in the instrument site prep guides.
It is important that installed antivirus software does not interfere with sequencing runs. For more information, refer to the site prep guide for your system.
Language and Regional settings
Instrument computer language and regional settings are set to English (United States) by default. Do not change this setting. The software is not designed to run in another language. Changing this setting can cause secondary analysis failures and communication problems between the computer and the instrument.
Daylight saving settings are enabled by default for correct syncing with BaseSpace Sequence Hub. Do not change this setting.
For any feedback or questions regarding this article (Illumina Knowledge Article #5253), contact Illumina Technical Support .
In the pop-up window, choose whether to Edit Setup or to Requeue with the original setup information.
If Edit Setup was chosen, change the desired parameters, then select Requeue Analysis. The status shows “Analysis Completed” when the requeued analysis has completed.
To import data to a new analysis module:
Note: Importing run data can be used to reanalyze an existing run in a new workflow, or for off-instrument analysis.
From the dashboard, select Create Run and select the desired module. On the next page, set the run parameters, then select Save Run. The run parameters must be the same as the original run. Important information to include is the read type and number of read cycles, the number and length of index reads, and whether custom primers were used. The original run setup can be determined in different ways depending on the source data:
For runs previously analyzed in Local Run Manager, select the original run in the Dashboard. Select the Samples & Results tab then Requeue Analysis. Select Edit Setup to view the run configuration.
When using Local Run Manager 2, the Import Sample Sheet option can be used to autopopulate the read and sample information.
The number of read cycles for a run can be found in the RunInfo.xml file in the run folder.
For more information on setting module-specific parameters, refer to the .
In the dashboard, identify the run that was just created.
Select More Options (three vertical dots) next to the newly created run, and select Import.
Enter the full run folder path and the output folder location. Ensure the output folder location is different from the run folder path.Note: Local Run Manager does not support mapped drives or directories, but does support Universal Naming Convention (UNC) paths. Local Run Manager may fail to import runs from locations under user-specific folders, such as Desktop and Documents. Importing runs from universally accessible locations is recommended. Runs imported from network locations may take longer to analyze than runs imported from a local drive.
Select Import Run to start the analysis. The status shows “Analysis Completed” when the requeued analysis has completed.
For any feedback or questions regarding this article (Illumina Knowledge Article #1324), contact Illumina Technical Support .

MiniSeq: D:\Illumina\MiniSeq Sequencing Temp[Run Folder]\Images\Focus
NextSeq 500/550: D:\Illumina\NextSeq Control Software Temp[Run_Folder]\Images\Focus
Example Focus Images:
Clustering
Phenotype
Example Image
Normal cluster density ~220 k/mm2
Standard clustering
Ultra low cluster density
All cameras disabled at cycle 1 Visible background between clusters White edges due to increased intensity
Very low cluster density
All cameras disabled at cycle 1 Visible background between clusters
Low cluster density
Low intensity or high G base calling Visible background between clusters No white edges
For any feedback or questions regarding this article (Illumina Knowledge Article #6325), contact Illumina Technical Support .
Figure 1. Metrics tab in BSSH.
Locate the Per Read Metrics table.
Locate the READS PF column.
Values are the calculated number of READS PF per lane.
For a paired-end run, multiply this number by two to calculate the total number of READS PF per lane.
To obtain the number of READS PF for the entire run, add the total number of READS PF for each lane.
Figure 2. READS PF values are the calculated number of READS PF per lane. For a paired-end run, multiply this number by two to calculate the total number of READS PF per lane. For example, the NovaSeq run shown here has 2,313125,376 READS PF in Read 1 in lane 1. Because this is a paired-end run, the total number of READS PF in lane 1 is 4,626,250,752.
How to access READS PF in the INDEXING QC tab
Navigate to the INDEXING QC tab.
Locate the PF READS column per lane.
To switch between lanes, use the drop-down menu.
To obtain the number of READS PF for the entire run, add the total number of PF READS for each lane.
Note: The INDEXING QC metrics are calculated after demultiplexing, and therefore provide a more accurate read count than the metrics tab.
Figure 3. In the INDEXING QC tab, total number of reads passing filter are shown per lane. To switch between lanes, use the drop-down menu.
Navigate to the Summary tab.
The Cluster Count PF (M) column shows the number of reads passing filter in millions per lane and per read.
To obtain the total number of reads passing filter per read, add the values for a particular read. In this case, Read 1 contains 4,659,600,000 clusters passing filter.
Note: Unlike BaseSpace Sequence Hub, Sequencing Analysis Viewer shows metrics by read, not by lane.
Figure 4. In the Summary tab, the Cluster Count PF (M) column shows the number of reads passing filter in millions per lane and read. For example, Read 1 of lane 1 contains 2,313,130,000 reads passing filter. To obtain the total number of reads passing filter per read, add values 2,313,130,000 and 2,346,470,000. In this case, Read 1 contains 4,659,600,000 reads passing filter. The total number of reads passing filter for this run is ~9,319,200,000.
To determine the total number of reads passing filter for a run, add all the values in the Cluster Count PF column, excluding non-index reads.
The precise value is in the Indexing tab under the PF Reads column.
Figure 5. Selection pane on SAV for Indexes Passing Filter
Note: Values are represented slightly differently in BSSH and SAV. In both programs, the PF Reads tabs represent identical values, as do the Reads PF and Cluster Count PF (M) in the summary tabs.
For more information about Sequencing Analysis Viewer or BaseSpace Sequence Hub, visit their respective support pages:
For any feedback or questions regarding this article (Illumina Knowledge Article #6529), contact Illumina Technical Support .
Qualification Service
Qualification Recommended Intervals
Event-Specific Service
Installation Qualification (IQ)
During initial installation
After relocation and reinstallation
Before first-time use
After general changes to lab environment (eg, remodeling, construction, electrical disruptions)
Operational Qualification (OQ)
During initial installation
After a reactive service, or software upgrade, or preventive maintenance
Periodically, according to lab standard operating procedure
With an IQ to test for baseline level of instrument performance
Before starting a major study or experiments
Performance Qualification (PQ)
After any qualified major repair
After maintenance, replacement, or upgrade of selected modules
For any feedback or questions regarding this article (Illumina Knowledge Article #7027), contact Illumina Technical Support .
Q scores are defined as a property that is logarithmically related to the base calling error probabilities (P).
Q = − 10 log10 P
For example, if Phred assigns a Q score of 30 (Q30) to a base, this is equivalent to the probability of an incorrect base call 1 in 1000 times (Table 1). This means that the base call accuracy (i.e., the probability of a correct base call) is 99.9%. A lower base call accuracy of 99% (Q20) will have an incorrect base call probability of 1 in 100, meaning that every 100 bp sequencing read will likely contain an error. When sequencing quality reaches Q30, virtually all of the reads will be perfect, having zero errors and ambiguities. This is why Q30 is considered a benchmark for quality in next-generation sequencing. By comparison, Sanger sequencing systems generally produce base call accuracy of ~99.4%, or ~Q20. Low Q scores can increase false-positive variant calls, which can result in inaccurate conclusions and higher costs for validation experiments.
Illumina Data Quality
Illumina Q score calculations have been shown to be very similar to the actual data quality observed in human genome sequencing. Figure 1 shows the predicted and empirical quality scores from a HiSeq 2000 Quality Scores for Next-Generation Sequencing Assessing sequencing accuracy using Phred quality scoring. run are well correlated. Q scores can reveal how much of the data from a given run is usable in a resequencing or assembly experiment. Sequencing data with lower quality scores can result in a significant portion of the reads being unusable, resulting in wasted time and expense. PhiX quality scores for the MiSeq and HiSeq systems show that nearly all bases have scores > Q30 for single and paired-end reads (Figure 2). Comparison of E. coli whole-genome sequencing data shows that this high data quality is consistent across both platforms (Table 2).
Accurate Sequencing Chemistry
Illumina sequencing by synthesis (SBS) technology delivers the highest percentage of error-free reads, with a vast majority of bases having quality scores above Q30. In many cases, even higher quality scores of Q35-Q40 are available. The latest version of the chemistry, TruSeq™ SBS and Cluster Generation v3 reagents, have been optimized for accurate base calling even within difficult-to-sequence regions of the genome, such as repeats, homo polymers, and high GC regions. TruSeq v3 chemistry is available for the HiSeq and MiSeq systems. The unparalleled TruSeq accuracy is ideal for next-generation sequencing in clinical environments that demand the highest standard of quality. Since the release of the original Illumina Genome Analyzer™ system, SBS technology has been used in the widest range of sequencing applications, resulting in more than 2,000 peer-reviewed publications in just five years—a feat unmatched for any other life science technology.
SBS chemistry uses four fluorescently labeled nucleotides to sequence up to billions of clusters on the flow cell surface in parallel. During each sequencing cycle, a single labeled deoxynucleoside triphosphate (dNTP) is added to the nucleic acid chain. The dNTPs contain a reversible blocking group that serves as a terminator for polymerization, so after each dNTP incorporation, the fluorescent dye is imaged to identify the base and then enzymatically cleaved to allow incorporation of the next nucleotide. Since all four reversible terminator-bound dNTPs (A, C, T, G) are present as single, separate molecules, natural competition minimizes incorporation bias, which can be problematic with serial nucleotide incorporation chemistry used in Sanger sequencing. Base calls are made directly from signal intensity measurements during each cycle, greatly reducing raw error rates compared to other technologies. The result is highly accurate base-by-base sequencing that eliminates sequence context-specific errors, enabling robust base calling across the genome, including repetitive sequence regions and homopolymers.
Summary
Q scores are used to measure base calling accuracy, one of the most common metrics for assessing sequencing data quality. Low Q scores can lead to increased false-positive variant calls, resulting in inaccurate conclusions and higher costs for validation experiments. Illumina’s sequencing chemistry delivers unparalleled accuracy, with a vast majority of bases scoring Q30 and above. This level of accuracy is ideal for a range of sequencing applications, including clinical research.
See the full Quality Scores for Next-Generation Sequencing tech note here.
For any feedback or questions regarding this article (Illumina Knowledge Article #6557), contact Illumina Technical Support .

With patterned flow cells, the calculation of %PF is different because there is no template generation step—fixed cluster locations eliminate the need for template generation. Because template generation and the associated preliminary filtration steps are not applied, empty wells or clusters that may be dim, low quality, or polyclonal are included in the raw cluster count, which leads to lower %PF values. Although the percent passing filter metric will be much lower with patterned flow cells, it will not affect performance or data quality.
Summary
Due to the differences in the %PF calculation methods, patterned flow cells have artificially lower %PF metrics compared to nonpatterned flow cells. With patterned flow cells, there is no template generation or preliminary filtration step during image analysis, which results in lower %PF values. Although the %PF values are lower, the uniform feature sizes and optimal spacing enable significantly increased cluster density for patterned flow cells
* The %PF calculations involve the application of a chastity filter to each cluster. Chastity is defined as the ratio of the brightest base intensity divided by the sum of the brightest and second brightest base intensities. Clusters “pass filter” if no more than 1 base call has a chastity value below 0.6 in the first 25 cycles. This filtration process removes the least reliable clusters from the image analysis results.
For any feedback or questions regarding this article (Illumina Knowledge Article #6309), contact Illumina Technical Support .
NextSeq 500/55
NextSeq 1000/2000
NovaSeq 6000
HiSeq 1500/2500
HiSeq 3000/4000
HiSeq X
iScan
Status of evaluation:
For all models other than HiSeq series: the base shipping configuration is not affected.
For all HiSeq series models: the base shipping configuration is mitigated.
For all models: certain software installations and configurations may introduce affected components.
Known Affected Components:
Illumina Local Run Manager (LRM)
This optional software module ships with an optional subcomponent, the Genome Analysis Tool Kit (GATK, MIT**),** which contains an affected version of log4j v.1.x.
This component is not accessible remotely, requires authenticated console access, and requires a measurable amount of preparation to execute a successful attack.
This module is currently risk assessed as mitigated. CVSS 3.1 scale Base score: 6.1 Medium, Temporal and Environmental scores 5.4 Medium CVSS:3.1/AV:L/AC:H/PR:H/UI:N/S:C/C:H/I:L/A:N/E:U/RL:W/RC:C
All HiSeq models:
All HiSeq models ship with the Broadcom LSI MegaRAID Storage Manager Suite installed. This software contains an affected version of log4j v.1.x. The default shipping configuration of the HiSeq unit blocks remote access to this component, which requires authenticated console access, and requires a measurable amount of preparation to execute a successful attack.
Note: If the device firewall settings have been disabled or modified, remote access to this software component on TCP:80 (HTTP) is possible. Customers are advised to confirm that any system modifications have not disabled the default firewall settings.
Illumina takes data privacy and security issues very seriously, and we hope this information helps alleviate any concerns about this vulnerability. If you have any questions, email [email protected].
For any feedback or questions regarding this article (Illumina Knowledge Article #6291), contact Illumina Technical Support .
LRM v2:Index读长最多可以设置100个字符(请参阅:Local run Manager 2: 如何使用自定义文库制备试剂盒技术文档)。
LRM v3:最多输入20个字符。如果需要20-100 bp读长,请选择手动上机模式。
LRM v4:最多输入20个字符。如果需要20-1000 bp读长,请选择手动上机模式。
为确保Index Reads的测序质量,请勿超过Index支持的最大长度。
表 2. 测序平台的最大单个Index长度
*通过云端设置测序运行时,Index长度会受到以下列出的 BCL Convert 限制。 **Index长度为20-1000bp之间时,通过手动模式设置测序运行,因为LRM V4的上限为20bp。 ***手动设置测序运行不在测序仪进行分析的话,Index长度不受软件限制。
请注意,BCL Convert对Index长度是有限制的。BCL Convert 4.2以及之前版本,Index总长度不能超过27bp。 BCL Convert 4.3以及之后版本,Index长度限制提高到每个Index最长27bp。
如果使用 BCL Convert 设置override cycle,那么在Index读取中指定的用于 UMIs(U)的碱基将不会计入Index长度的计算中。
For any feedback or questions regarding this article (Illumina Knowledge Article #7102), contact Illumina Technical Support .

For any feedback or questions regarding this article (Illumina Knowledge Article #1511), contact Illumina Technical Support .

In the Command Prompt, type net use and press 'Enter' to run the command.
The output will list the local drive letter under the 'Local' column and UNC path under the 'Remote' column for each network resource that has been mapped to that instrument.
Figure 1: Example output of the net use command with the UNC path listed under the 'Remote' column in the output.
For any feedback or questions regarding this article (Illumina Knowledge Article #2274), contact Illumina Technical Support .
有关NovaSeq X/X Plus废液的更多信息,请参见Handling and Disposal Recommendations for Used Reagents on the NovaSeq X/X Plus.
MiSeq i100 / i100 Plus
试剂卡盒不含甲酰胺,可以像PCR产品废弃物一样丢弃。
请穿戴合适的个人保护装备安全处理甲酰胺试剂。在不同地区,根据废液中甲酰胺和其它有害成分,对废液的处理也有所差异。请联系当地的环境卫生和安全(EH&S)办公室,确定对有害物质的界定以及如何处理容器和未使用的有害物质,以符合环境安全。如果需要Illumina试剂中化学成分的更多信息,请参考Illumina支持页面中的安全数据表(SDS)。
For any feedback or questions regarding this article (Illumina Knowledge Article #7131), contact Illumina Technical Support .

Place the wash cartridge upside down with some space to allow air flow and proper drying.
Inspect the wash cartridge wells regularly for contamination (refer to Fig. 1, black or pink discoloration may be noted).
Figure 1. Black ring at bottom of wash cartridge well.
Prepare a 1-3% lab-grade bleach solution to fill the wells of the tray.
Use a brush to remove the mold from the wells.
IMPORTANT: Thoroughly rinse the wells (at least three times) with DI or lab-grade water (residual bleach can cause clustering issues on subsequent runs).
Place cartridge upside down with some space to allow air flow and proper drying.
Repeat as necessary if mold is still present.
If it is not possible to remove all the mold, contact to discuss replacing the wash cartridges.
For step-by-step guidance, refer to this.
Resources
For any feedback or questions regarding this article (Illumina Knowledge Article #5283), contact Illumina Technical Support .
For any feedback or questions regarding this article (Illumina Knowledge Article #5767), contact Illumina Technical Support [email protected].
For any feedback or questions regarding this article (Illumina Knowledge Article #6608), contact Illumina Technical Support [email protected].
Background
The MiSeq i100 and NovaSeq X Series instruments require users login to the Control Software using either a Local or Cloud login. If the instrument is not connected to the internet and the Cloud login is not required, use the following steps to disable the Cloud login feature and only use the Local login.
The Cloud login should only be disabled if the instrument is completely disconnected from an internet connection. This procedure disables all Cloud upload features including both Proactive and BaseSpace features. For more information on Proactive, see the following resources:
Illumina Proactive - Instrument Services
Proactive connectivity guide for Miseqâ„¢ i100 Series
Proactive connectivity guide for NovaSeq X Series
Resolution Actions
Disabling Cloud Login
Ensure the instrument is idle and there are no Active sequencing Runs or DRAGEN Analyses.
Log into the instrument as an Administrator account.
Access the Settings Menu:
If the Cloud Settings menu presents the message "An unexpected error has occurred. Details: Internal Server Error," see the following steps.
Navigate to the Cloud Settings menu.
Confirm that all checkboxes are de-selected and the Hosting Location is blank.
Select Save, then wait 2 minutes. It is expected to display a 'loading circle' that does not resolve.
Figure 1: Highlighting the empty Hosting location selection within the dropdown menu.
Figure 2: Highlighting the empty Hosting location selection.
Re-enabling Cloud Login
Ensure the instrument is idle and there are no Active sequencing Runs or DRAGEN Analyses.
Login to the instrument as an Administrator account.
Access the Settings Menu:
Achieving optimal cluster density is critical to high-quality sequencing on MiniSeq, MiSeq, NextSeq 500/550, and HiSeq 2500 Systems. On nonpatterned flow cells, cluster density has a significant impact on run performance, specifically data quality and total data output. While underclustering can maintain high data quality, it results in lower data output. Alternatively, overclustering can lead to run failure, poor run performance, lower Q30 scores, introduction of sequencing artifacts, and lower total data output. This bulletin summarizes the resources and best practices to avoid underclustering and overclustering, and to achieve more consistent cluster densities.
Quality check and accurate quantification of libraries is critical. If not performed, it is the most common cause of inconsistent cluster density. Always follow methods listed in the Library Quantification and Quality Control Quick Reference Guide bulletin to check Illumina libraries.
Follow the latest instrument-specific guidelines to dilute and denature libraries:
Best practices for library denaturation:
The NaOH stock solution must have a pH >12.5 prior to any dilution. Check the pH of the stock solution before diluting. The recommended stock concentration is found in the appropriate instrument system guide or denature and dilution guide.
Always prepare freshly diluted NaOH for denaturing libraries at time of use.
For highly structured or GC-rich libraries, cluster density consistency improves when the library is heat denatured before loading the pool onto the instrument. This method is optional for other libraries.
After NaOH denaturation of the sequencing library and dilution in HT1 to the final loading concentration, incubate the diluted library at 96°C for 2 minutes using a heat block.
After the heat incubation, invert the tube 1-2 times to mix.
Consider the average size of your library. Because the clustering process preferentially amplifies shorter libraries in a mixture of fragments, large libraries tend to cluster less efficiently than smaller libraries. The technical note lists guidelines for loading concentrations based on the average size of the library.
Special consideration is needed when sequencing to ensure consistent cluster density and good data quality. For low diversity sequencing guidelines, refer to the Technical Note for the appropriate instrument: , , , and .
When contacting Illumina Support for assistance, Illumina Support can efficiently access the relevant Instrument Performance Data via one or more of the following applications:
Proactive: Select Send Instrument Performance Data to Illumina in the control software before starting a run. Provide the Run ID to Illumina Support to facilitate investigation.
BaseSpace Sequence Hub: Share the run using the Share dropdown menu, then select Get Link to generate a URL to send to Illumina Support.
: Permit Illumina Support to remotely connect to the instrument.
If your institutional policy does not allow the instrument to connect to the external network, or additional files are required by Illumina Support for investigation, send less than 50 Mb of data directly by attaching to an email. Only email attachments less than 50 Mb can be received by Illumina Support. If the files are too large to attach, contact [email protected] and request a file transfer link to upload the files to a secure location. If your institution requires an alternative method for transferring files, provide the instructions to Illumina Support to access the files.
Investigation can be expedited if relevant files or folders, depending on the type of issue, are already collected for transfer.
To easily send the data, any of the required files or folders can be copied to a new folder.
Zip/compress the folder to maintain the original file structure.
Some instrument systems have a zipping function built in that can be accessed by right-clicking on the file and choosing to send files to a compressed folder.
A list of different files and their locations that may be requested by Illumina Support is provided below for each instrument.
iSeq 100
*Clustering failure is indicated by an error observed at cycle 7 if running iSeq Control Software v1.4 or higher. If running v1.3 or lower, a cluster failure is indicated by a drop in intensity at cycle 9 and 0% PF (clusters passing filter).
**The ProgramData folder may be hidden. To un-hide files, select the View tab in the File Explorer window and make sure Hidden Items is selected.
MiniSeq
*Cycle 1 failure is indicated by all cameras becoming disabled at cycle 1 due to an inability to detect clusters.
**The ProgramData folder may be hidden. To un-hide files, select the View tab in the File Explorer window and make sure Hidden Items is selected.
MiSeq
*Cycle 1 failure can be indicated by one of the following errors observed at cycle 1: Best focus not found; Best focus is too near edge of range; No usable signal found, it is possible clustering has failed; Through-focus peak did not exceed SNR threshold; Z Motor attempt to move outside soft limits.
NextSeq 500/550
*Cycle 1 failure is indicated by all cameras becoming disabled at cycle 1 due to an inability to detect clusters.
**The ProgramData folder may be hidden. To un-hide files, select the View tab in the File Explorer window and make sure Hidden Items is selected.
NextSeq 1000/2000
NovaSeq 6000
*The ProgramData folder may be hidden. To un-hide files, select the View tab in the File Explorer window and make sure Hidden items is selected.
NovaSeq X Series
See Illumina Statement on Novel Coronavirus and follow the Illumina Perspective on the Novel Coronavirus SARS-CoV-2 (2019-nCoV) Outbreak web page for further updates.
General Guidelines for Decontaminating Illumina Systems
In keeping with recommendations from the United States CDC and World Health Organization (WHO), Illumina recommends the following procedure for decontaminating instruments suspected or known to have come in contact with novel coronavirus (2019-nCoV):
Decontamination steps
Wear appropriate personal protective equipment before entering a contaminated space
Perform a maintenance wash with laboratory-grade water to flush the fluidics systems
Shut down the instrument and unplug the instrument from power outlets prior to applying any cleaning agent
Refer to the specific instrument system guide for appropriate shutdown procedures
Spray all accessible components and surfaces with a 10% bleach solution and allow solution to remain on the surface for at least 10 minutes
Select the appropriate spray pattern to avoid splashing of the bleach solution
Use a pre saturated wipe for sensitive electronic equipment
After the minimum 10 minute contact time, use a heavy-duty wipe to remove excess bleach before it dries IMPORTANT: Any exposed parts consisting of stainless steel or aluminum should then be wiped down with a 70% ethanol solution to remove excess bleach
The 70% ethanol solution should be wiped off with a heavy-duty wipe before it dries
Use caution when using ethanol near ignition sources such as electrical outlets
Make sure that all the following accessible components and surfaces are cleaned:
Outer skins of the instrument
Doors and parts accessible to the user
Additional Resources
World Health Organization (WHO) Guidance
Illumina Support Bulletins:
若希望低多样性文库在NextSeq500/550和Miniseq平台上获得精确和稳定的测序结果,需要精心设计的实验以及良好的生信分析。低多样性文库最常见的例子是基于扩增方法制备的文库,例如16S扩增子文库。这些文库扩增引物结合的位置,即起始位点的DNA序列基本是相同的。单一的位点会导致碱基组成不平衡,以至于碱基组成从一个循环到下一个循环可能会发生剧烈变化。
NextSeq500/550和Miniseq系统使用的是双通道测序技术。因此,确保每个循环中均存在4种DNA碱基是非常重要的,这样分析软件才能正确鉴定DNA簇并精确读取碱基序列。使用低多样性文库时,为了满足这种要求,我们建议在设计实验时,采用以下几种方法保证每个循环的多样性。
利用标签区分技术,在测序中加入多个带有标签的来自多种应用的样品。
o 那些来自多样性较高的应用的带有标签的样品,例如人类扩增子测序、富集或者全基因组测序文库,都能够用来增加文库碱基多样性。
o 为了最佳测序结果,可以利用单标签或者双标签技术,将多个样品在同一张Flow Cell上进行测序。
在测序中掺入
o 可以加入50% 为初始掺入比例,然后根据一级分析和二级分析的结果,逐步降低PhiX掺入比例。掺入这样的样品能提供每个循环必需的碱基多样性。
对于NextSeq和MiniSeq系统,建议测序时簇密度低于平衡库(如PhiX)建议的最佳簇密度的30-40%。
o Miniseq试剂建议平衡文库的原始簇密度最佳范围为170-220 K/mm2。
o NextSeq500/550试剂建议平衡文库的原始簇密度最佳范围为170-220 K/mm2。
本文上述中的这些建议能够使得NextSeq500/550和Miniseq平台进行低多样性文库测序。
When pooling libraries for sequencing on the NextSeq 500/550 and MiniSeq systems, it is important to select compatible index combinations, otherwise, the Index Read sequencing can fail due to cluster registration failures. This bulletin provides guidelines for pooling Illumina libraries on the NextSeq 500/550 and MiniSeq systems. 2-Channel Sequencing
NextSeq 500/550 and MiniSeq systems use two images to determine all four base calls, one red channel and one green channel. Rather than using a separate fluorescent dye for each base, 2-channel sequencing uses combinations of two fluorescent dyes: red for C, green for T, green and red for A, and no dye for G.
Figure 1: Two-channel SBS fluorescent imaging (false color image of the dyes is shown for illustration purposes). Accelerated detection of all four DNA bases is performed on the MiniSeq and NextSeq 500/550 series systems using two images to capture red and green wavelength bands. Clusters seen only in red or green images are identified as C and T bases, respectively. Clusters observed in both red and green images are identified as A bases, while unlabeled clusters are identified as G bases.
Index Considerations
Index Reads must begin with at least one base other than G in either of the first two cycles. If an Index Read begins with two base calls of G, no signal intensity is generated, and cluster registration will fail. Signal must be present in either of the first 2 cycles to ensure demultiplexing performance.
Select index sequences that provide signal in at least one channel, preferably both channels, for every cycle.
Red channel - A or C
This base calling process ensures accuracy for data analysis.
Index Combinations Example
Ideal index combinations: contain signal in both channels for every cycle.
Acceptable index combinations: have signal in only one channel, but there is still enough signal to sequence.
Unacceptable index combinations: will fail registration because the index read begins with 2 base calls of G and no signal intensity is generated.
More information about 2-channel sequencing can be found on the web page
When setting a network location as the default output location on instruments that are running Local Run Manager and Universal Copy Service (UCS), there are specific requirements that must be met for UCS to recognize the path as valid.
The path must be the fully qualified Universal Naming Convention (UNC) path.
Example: \server\share_folder\directory\
Do not use the drive letter when setting a network location as the default output folder.
Example: Z:\Illumina_Output
Paths to the desired output folder should be at least two folders deep from the root server location and have a trailing backslash:
Example:\servername\share_folder\directory1\
The path must not contain hidden shares or locations, typically designated by '$' characters
Example: \server$share_folder\directory\
The service account used to login into the network must have read/write access to the shared folder.
It is acceptable for the account to have read-only access to parent folders.
PhiX测试Run是Illumina用来确认测序仪硬件和软件是否可以正常工作的实验方法。这里所用的PhiX参照文库基因组碱基的平衡性很好,A,T,C,G四种碱基的比例相对均一。Illumina 目前提供两种类型的PhiX产品可供用户选择。
PhiX Control v3 , 该文库没有Index 不适用于Index 测序的性能评估。这种推荐用于验证运行(validations runs)。更多信息可以点击查看
PhiX Indexed Control. 这种 PhiX 不推荐用于验证运行(validations runs)。 更多信息可以点击查看
测试时, 确保PhiX参照文库的簇密度落在最佳范围内对测试结果的准确性非常重要。请参考下面表格了解不同测序平台PhiX的上机浓度和簇密度建议(这些推荐的参数是基于PhiX control v3 ):
Sequencing reagent performance depends on thawing technique and thawed reagent storage time and conditions. It is important to understand and follow the recommendations for reagent thawing and storage because some reagents contain enzymes that are sensitive to temperature and time. Unless specified below, refreezing thawed reagents can negatively affect enzyme activity and run performance.
iSeq 100 Reagent Kits ()
After receiving reagent shipment, store reagent cartridge in the freezer at -20°C to -25°C with the arrow pointing up for at least 24 hours before thawing for use. There are several ways to thaw the reagent cartridge:
For NovaSeq 6000
On the NovaSeq 6000, the Illumina Universal Copy Service runs as the currently logged in account. To perform sequencing, always login with a standard (non-administrator) account.
To verify you are sequencing using a standard account:
Login to the instrument using the account you plan to perform sequncing with
Background
The PhiX control library is a well-balanced, high diversity library that can be used as a positive control during Sequencing Runs on Illumina platforms. However, due to an average insert size of 375 bp and total library size of 500 bp, the current PhiX v3 product is not compatible with Reads longer than ~350 cycles.
The new PhiX Indexed Control (1000 Cycle) formulation addresses this by increasing the insert length, enabling users to spike-in PhiX control when performing high cycle count Runs.
Technical Details
Insert Size
Benchtop Instruments running the Windows 10 Operating System (OS), may require periodic password updates. When prompted, as shown in Figure 1a, select OK, then update the Windows password, as shown in Figure 1b.
Figure 1a. Password update prompt.
Figure 1b. Password update.
Universal Copy Service (UCS) and Local Run Manager (LRM) are components of the Control Software which are used to transfer sequencing run data, setup runs, and analyze data. These components run as Windows services which may be configured to Log On As any Windows account. Changing the password of a Windows account running UCS or LRM services will not automatically update the passwords for the services. This article provides instructions for updating the UCS and LRM service passwords following a Windows account password update.
A PhiX validation run confirms proper hardware and software performance of the instrument. The Illumina PhiX control library is a well-balanced genome with relatively equal representation of A, T, G, and C. Illumina has currently two PhiX products available.
PhiX control v3 Library, which lacks an index and is not an appropriate tool for assessing Index Read performance. This is the recommended PhiX to perform validations runs. For further information, see
PhiX Indexed Control. This PhiX is not recommended to perform validation runs. For further information, see
For any feedback or questions regarding this article (Illumina Knowledge Article #3683), contact Illumina Technical Support [email protected].
For best results, always thaw sequencing reagents before denaturing and diluting libraries. For further instructions, see the system guide for your instrument and the bulletin: How to thaw and store sequencing reagents for optimal performance.
Follow the denature and dilute libraries guide for your instrument. - For HiSeq 2500 and the MiSeq series, it is important that the final solution of NaOH is not more than 1 mM NaOH after diluting with HT1. Greater than 1 mM NaOH inhibits template hybridization efficiency. - When denaturing libraries for NextSeq 500/550 and MiniSeq, use 200 mM Tris-HCl pH 7.0 to make sure that the NaOH is fully hydrolyzed in the final solution. As a result, template hybridization is not affected even when the final NaOH concentration is greater than 1 mM (see NextSeq 500/550 and MiniSeq denature and dilution guides, above).
Quickly move the library to an ice water bath for 5 minutes. The quick cooling step helps lock the library in its single stranded form.
Proceed immediately to cluster generation.
For any feedback or questions regarding this article (Illumina Knowledge Article #1481), contact Illumina Technical Support [email protected].
Particular emphasis should be placed on:
Areas where samples are loaded and processed
Peripherals that are contacted during normal instrument use such as touch screens, mouse devices, and keyboards
For any feedback or questions regarding this article (Illumina Knowledge Article #2376), contact Illumina Technical Support [email protected].
For any feedback or questions regarding this article (Illumina Knowledge Article #7110), contact Illumina Technical Support [email protected].
This module is currently risk assessed as mitigated. CVSS 3.1 scale Base score: 6.1 Medium, Temporal and Environmental scores 5.4 Medium CVSS:3.1/AV:L/AC:H/PR:H/UI:N/S:C/C:H/I:L/A:N/E:U/RL:W/RC:C
On the NovaSeq X Series Control Software Home screen, select the instrument icon, then select Settings.
Select Cloud Settings.
De-select all checkboxes under Run settings and Illumina Proactive.
Remove any entries in the Private domain name field.
Within the Hosting Location dropdown menu, select the blank entry above the BSSH USA (N. Virginia) selection (Figure 1).
The Hosting location selection should be empty after selection (Figure 2).
Select Save.
Navigate back to the Home screen, then select the dropdown menu in the top-left corner, and then sign out of the Admin account.
Click the screen to initiate Control Software login and confirm if Local Login presents as the default option.
On the NovaSeq X Series Control Software Home screen, select the instrument icon, then select Settings.
Select Cloud Settings.
Select the appropriate regional Hosting Location using the dropdown menu.
For Enterprise users, input the Private domain name in the free text field.
Select the desired checkboxes under Run settings and Illumina Proactive.
Illumina Proactive - Uploads hardware and run performance data to Illumina Support for troubleshooting purposes.
Cloud run monitoring - Uploads run metrics to BaseSpace for user run monitoring.
Cloud run storage - Uploads run metrics and data to BaseSpace, required for Cloud Analysis.
Select Test Configuration and confirm all required URLs are reachable.
Consult the local IT team to add the affected URLs to local network security allow list if any URLs are not reachable.
If Test Configuration is PASS, select Save.
For any feedback or questions regarding this article (Illumina Knowledge Article #9462), contact Illumina Technical Support [email protected].


For any feedback or questions regarding this article (Illumina Knowledge Article #3400), contact Illumina Technical Support [email protected].


Green channel - A or T
For any feedback or questions regarding this article (Illumina Knowledge Article #1241), contact Illumina Technical Support [email protected].


测序平台
最佳上机浓度
最佳原始簇密度
iSeq 100
100 pM
N/A*
MiniSeq
1.4 pM
170-220K clusters/mm2
MiSeq v2 reagents
12.5 pM
1000-1200K clusters/mm2
MiSeq v3 reagents
20 pM
1200-1400K clusters/mm2
NextSeq 500/550 High Output reagents
1.8 pM
170-220K clusters/mm2
NextSeq 500/550 Mid Output reagents
1.5 pM
170-220K clusters/mm2
NextSeq 1000/2000 (Onboard, Standard chemistry, XLEAP chemistry P1/P2)
650 pM**
N/A*
NextSeq 2000 (Onboard, XLEAP chemistry, P3/P4 and 600-cycle P1/P2)
450 pM**
N/A*
NovaSeq 6000 - Standard Workflow
250 pM**
N/A*
NovaSeq 6000 - XP Workflow
100 pM**
N/A*
NovaSeq X - 1.5B/10B
140 pM**
N/A*
NovaSeq X - 25B
140 pM**
N/A*
MiSeq i100
120 pM**
N/A*
*Patterned flow cells上面都有固定量的纳米孔,所以不同的run显示的簇密度都是相同的。如需评估簇密度情况,推荐通过绘制 %Occupied 与 %PF 关系图查看。
**为最终的上机浓度
对于PhiX测试Run,测序读长和参数可以根据实验目的进行调整,但是请注意Read1和Read2必须至少是26个Cycles,这样仪器上的数据分析软件才能生成质量分数(Quality Scores)。
有关为Illumina测序平台准备PhiX测试Run的更多信息,请参见以下文档:
Denature and Dilute Protocol Generator (for MiSeq, NextSeq 500/550, NextSeq 1000/2000, NovaSeq 6000, MiSeq i100 and NovaSeq X Plus instruments)
备注: 推荐对Phix 原管储存液进行Qubit 或qPCR定量后再稀释到需要的浓度使用。
For any feedback or questions regarding this article (Illumina Knowledge Article #7139), contact Illumina Technical Support .
If thawed in a refrigerator (2°C to 8°C) for a minimum of 36 hours, not exceeding 1 week
If thawed in room temperature air (20°C to 25°C) for a minimum of 9 hours, the cartridge is stable up to 18 hours in room temperature air
iSeq 100 i1 Reagent v2 kits can be thawed at 4°C for 36 hours and are stable at 4°C for up to one week prior to use
MiniSeq Reagent Kits (Thawing and Stability Guidelines for MiniSeq Reagent Kits)
There are several ways to thaw the reagent cartridge:
If thawed in a 37°C water bath for 35 minutes, it is stable up to 2 hours
If thawed in a room temperature water bath (19°C to 25°C) for 90 minutes, it is stable up to 24 hours
If thawed at room temperature air (19°C to 25°C) for 5 hours, it is stable up to 24 hours
If thawed at 2°C to 8°C for 18 hours, it is stable up to 72 hours
MiSeq v2 and v3 Reagent Kits (Reagent Stability and Thawing Guidelines for MiSeq Sequencing Kits)
There are several ways to thaw the reagent cartridge:
If thawed in a room temperature deionized water bath for 60 minutes, place on ice or set aside at 2°C to 8°C and use within 6 hours
If thawed overnight at 2°C to 8°C, store at 2°C to 8°C for up to 1 week
NextSeq 500/550 Reagent Kits (Instructions for thawing and storing NextSeq 500/550 reagents)
There are several ways to thaw the reagent cartridge:
If thawed in a room temperature deionized water bath for 60 minutes, place on ice or set aside at 2°C to 8°C, and use as quickly as possible or within the same day
If thawed overnight at 2°C to 8°C, store at 2°C to 8°C for up to 1 week - Note: Reagents require a minimum of 18 hours to thaw
NextSeq 1000/2000 Reagent Kits (Thawing and reagent preparation guidelines for the NextSeq 1000/2000 reagents)
XLEAP-SBS Sequencing Kits
Water Bath: Thaw in temperature controlled 25°C with a minimum of 9.5 cm water depth for 8 hours. Do not exceed 10 hours.
Refrigerator (2°C to 8°C): One day prior to anticipated run, remove cartridge from -25°C to -15°C storage. Thaw at room temperature for 6 hours. Transfer to refrigerator at 2°C to 8°C, then continue to thaw for a minimum of 16 hours. The cartridge is stable up to 72 hours in the refrigerator. During the room temperature thawing time, cartridges must have air on all sides except the bottom and must not be stacked. In the refrigerator, cartridges may be stacked but must be given space on all other sides.
Room temperature (20°C to 25°C): Place cartridges on wire rack for 12 hours and do not exceed 16 hours. During the room temperature thawing, cartridges must have air on all sides and must not be stacked.
Standard SBS Sequencing Kits
Water bath: Thaw in temperature controlled 25°C water bath, with a minimum of 9.5 cm water depth for 6-8 hours for 300 cycle or smaller kits; and 600 cycle kits require 8-10 hours.
Refrigerator (2°C to 8°C): One day prior to anticipated run, remove cartridge from -25°C to -15°C storage. Thaw at room temperature for 6 hours. Transfer to refrigerator 2°C to 8°C, and continue to thaw for a minimum of 12 hours for 300 cycle or smaller kits; or continue to thaw for a minimum of 16 hours for 600 cycle kits. The cartridge is stable up to 72 hours in the refrigerator. When thawing at room temperature, cartridge must have air on all sides except the bottom and must not be stacked. In the refrigerator, cartridges may be stacked but must be given space on all other sides.
Room temperature (20°C to 25°C) for a minimum of 9-16 hours for 300 cycle or smaller kits; 12 hours (16 hour maximum) for 600 cycle kit.
NovaSeq 6000 Reagent Kits (Thawing, stability, and storage of NovaSeq 6000 reagents)
NovaSeq Cluster and SBS cartridges
Thaw SP, S1, and S2 cluster cartridges in a room temperature deionized water bath for 2 hours
Thaw S4 cluster cartridges in a room temperature water bath for 4 hours
Thaw SP, S1, S2, and S4 SBS cartridges in a room temperature water bath for 4 hours
Store thawed reagents at 2°C to 8°C until use for up to 24 hours. Cluster and SBS cartridges can be refrozen once at -20°C if run cannot be set up right away.
NovaSeq XP Workflow Reagents
Thaw DPX1, DPX2 and DPX3 at room temperature for 10 minutes, then set aside on ice
For best results, use as soon as possible. For the best performance, prepare the ExAmp master mix immediately before use. Store the ExAmp master mix up to 1 hour on ice, or 30 minutes at room temperature. After loading the libraries and ExAmp, load flow cells onto the instrument within 30 minutes. If ExAmp reagents cannot be used, they can be refrozen one time only. If refreezing, do so immediately after thawing.
NovaSeq X Plus (Reagent stability and thawing guidelines for the NovaSeq X Series)
Reagent Cartridge
Water Bath: Remove cartridge from box, then remove cartridge from the bag. Submerge reagent cartridge in laboratory-grade water bath at 15°C to 30°C until the water reaches the bottom of the cartridge cover. Thaw for 4 hours and do not exceed 24 hours. Load cartridge into instrument within 24 hours. If reagents cannot be used within 24 hours, store at 2°C to 8°C for up to 72 hours or return to -25°C to -15°C storage for up to 7 days. After thawing, do not refreeze more than one time.
Refrigerator: Remove cartridge from box, then remove cartridge from the bag. Thaw in a 2°C to 8°C refrigerator for 48 hours. If reagent cartridge cannot be loaded into the instrument within 24 hours, store at 2°C to 8°C for up to 72 hours or return to -25°C to -15°C storage for up to 7 days. After thawing, do not refreeze more than one time.
Lyo Insert
Remove from -25°C to -15°C storage and thaw at room temperature for 10 minutes.
If Lyo Insert cannot be used within 24 hours, return to -25°C to -15°C storage. After thawing, do not refreeze more than one time.
Pre-load and Custom Primer Buffers
Remove from -25°C to -15°C storage and thaw at room temperature for 10 minutes.
Invert 5 times.
If buffers cannot be used within 8 hours, return to -25°C to -15°C storage. After thawing, do not refreeze more than one time.
Flow Cell
Remove flow cell from 2°C to 8°C storage.
Set the sealed flow cell package aside for 10-15 minutes to allow the flow cell to reach room temperature.
Leave flow cell in package until ready to load flow cell into instrument. Use the flow cell within 2 hours of removing it from 2°C to 8°C storage.
If flow cell cannot be used within 2 hours, return to 2°C to 8°C storage and use within 24 hours.
Dry Cartridge
Keep it in the foil packaging until it is ready to be loaded. The Dry Cartridge must be used within 4 hours of opening the foil packaging.
Wet Cartridge
Keep it in the foil packaging until it is ready to be loaded. The Wet Cartridge must be used within 4 hours of opening the foil packaging.
Denatured Libraries (Libraries + KLD Buffer)
Store the denatured libraries on ice after mixing the diluted libraries with the KLD buffer. The denatured libraries are stable on ice or at 4° C for up to 6 hours.
For any feedback or questions regarding this article (Illumina Knowledge Article #1533), contact Illumina Technical Support .
For Benchtop Windows 10 Instruments
Follow the steps below to ensure that Illumina Universal Copy Service Windows service is configured to Log On As a standard or administrator Windows account.
Log into Windows using the sbsadmin (or other administrator) account.
Open the Windows Services app.
Select the Windows Icon in the lower left.
Begin typing "Services" and the Services Desktop App will appear in the results.
Select Open.
Locate the Illumina Universal Copy Service within the list of service. Make note of the account name in the Log On As tab (.**MyUser** in this example)
For the UCS account identified above, perform the corresponding action below to ensure UCS is configured to Log On As a standard account:
Local Service
No action required.
Local System (factory default)
.\sbsadmin
(i.e. sbsuser) AND
.\sbsuser
IFstandard: No action required.
IF administrator :
All Other accounts (On or Off-domain)
IF standard: No action required.
IF administrator:
For any feedback or questions regarding this article (Illumina Knowledge Article #7852), contact Illumina Technical Support .
The PhiX Indexed Control (1000 Cycle) formulation has an average insert size of 700 basepairs (bp)
The total library length is approximately 825 bp on average
Indexing Strategy
The PhiX Indexed Control (1000 Cycle) library leverages a 10 bp, dual-index strategy and is a pool of 5 index combinations
This provides additional diversity and color balance in Index Reads when spiked into low-plexity library pools
The index combinations do not overlap with any current Illumina or IDT index combinations
For other Third Party Libraries, please review manufacturer's Library Preparation information for potential overlapping indexes before using the PhiX Indexed Control (1000 Cycle) library
(Optional) Demultiplexing PhiX Indexed Control
Adding the indexed PhiX libraries to the Sample Sheet for demultiplexing is not required.
If the indexed PhiX libraries are not added to the Sample Sheet, the reads sort to the Undetermined FASTQ files, similar to un-indexed PhiX v3 Control.
If required, add the PhiX Sample ID and Index combinations in Table 1 to the Sample Sheet to generate FASTQ files for the individual PhiX libraries within the pool.
Table 1: PhiX Indexed Control (1000 Cycles) Index Sequences
PhiX Sample ID
i7 Bases for Sample Sheet
i5 Bases for Sample Sheet (Forward)
i5 Bases for Sample Sheet (Rev. Complement)
PhiX-Index1
CGACCTAACG
ATACGCCGGC
GCCGGCGTAT
PhiX-Index2
TAGTTCGGTA
CTGTCACTTA
TAAGTGACAG
PhiX-Index3
ACCGGCCGTA
GGCGCCATTG
CAATGGCGCC
Loading Concentrations for the MiSeq i100 Series
See the MiSeq i100 Product Documentation for instructions on preparing PhiX spike-in controls.
See the Maximizing performance on the MiSeq i100 Series Technical Note for loading concentrations when setting up PhiX Control Run.
For other applications, the appropriate loading concentration and spike-in value must be empirically determined.
Platform Compatibility
The PhiX Indexed Control (1000 Cycle) is compatible with all Illumina sequencing platforms.
Due to the larger total library length, the PhiX Indexed Control (1000 Cycle) may cluster less efficiently on some platforms, and optimal loading concentrations must be empirically determined.
For any feedback or questions regarding this article (Illumina Knowledge Article #9867), contact Illumina Technical Support .
Cannot initiate communication with Universal Copy Service. Make sure that the service is installed and started.
The following required software is either not installed or not running. Sequence cannot be performed until this problem is fixed. Contact Illumina Technical Support. Universal Copy Service.
To update UCS and LRM service credentials with Local Run Manager v3.x, see the following instructions:
Select the Windows icon in the lower left corner of the screen. In the Windows search field, enter Services as shown in Figure 5. When Services appears in the results, right-click and select Run as administrator.
If prompted, enter administrator credentials (by default the credentials will be the sbsadmin user credentials) in the pop-up window.
Locate the Illumina services.
Right-click on Illumina Local Run Manager Analysis Service. Select Stop.
Right-click again on Illumina Local Run Manager Analysis Service.
Select Properties and navigate to the Log On tab.
Select This account and Browse... to search for the account. In the Select User window, select Advanced and then Find Now. Select the Windows account for which the password was just updated (default sbsuser) from the search results.
Select OK to acknowledge both windows.
Enter the new account (default sbsuser) password, select Apply and OK.
Restart the service.
Repeat steps 4-10 for Illumina Local Run Manager Job Service, Illumina Universal Copy Service,and Illumina Run Copy Service if they are present in the list.
Shut down and restart the system.
For how to cache credentials for Read/Write access to Network Storage and verify Read/Write access see Knowledge article .
Figure 2. In Windows Services, select Run as administrator.
Figure 3. Selecting Properties for Illumina Universal Copy Service.
Figure 4. Selecting the local user credentials after clicking Find Now.
To update UCS and LRM service credentials with Local Run Manager v4.x, see the following instructions:
In Local Run Manager (LRM), configure the Illumina services to use respective Log On As accounts via the admin account by accessing the Tools menu.
Open System Settings, select Service Accounts and select the respective option for each Service (note that Illumina recommends Universal Copy Service is ALWAYS configured with the sbsuser account).
Figure 5. Accessing the Service Accounts menu on Local Run Manager.
Figure 6. Example of using the sbsuser account log on credentials on LRM services and UCS.
Note: Each time the Windows 10 OS password is updated, the UCS/LRM Services credentials also must be updated. Contact [email protected] for further assistance.
For more detailed instructions, first-time setup, or to update the Internet Information Services (IIS) LRM user credentials for importing runs, refer to the Knowledge article How to cache credentials for access to Network Storage and verify Read/Write access.
For any feedback or questions regarding this article (Illumina Knowledge Article #1932), contact Illumina Technical Support .


Platform
Optimal Loading Concentration
Optimal Raw Cluster Density
iSeq 100
100 pM
N/A*
MiniSeq
1.4 pM
170-220K clusters/mm2
MiSeq v2 reagents
12.5 pM
1000-1200K clusters/mm2
MiSeq v3 reagents
20 pM
1200-1400K clusters/mm2
*Patterned flow cells consist of ordered nano wells, hence the reported cluster density from run to run is fixed. To assess clustering status, plotting %Occupied vs %PF is recommended. **Final loading concentration
Run length and parameters vary depending on troubleshooting needs, however, Read 1 and 2 must have at least 26 cycles to generate quality scores.
For further information about preparing PhiX for sequencing, see the following documents.
Denature and Dilute Protocol Generator (for MiSeq, NextSeq 500/550, NextSeq 1000/2000, NovaSeq 6000, MiSeq i100 and NovaSeq X Plus instruments)
Note: Quantification of the PhiX stock tube using Qubit or qPCR can be helpful to make sure PhiX is being diluted to the expected concentration.
For any feedback or questions regarding this article (Illumina Knowledge Article #1536), contact Illumina Technical Support .
High cluster density
No white edges Visible fold-like artifacts
No clusters
White edges indicate increased intensity to compensate for initial lack of clusters


Overall sequencing run performance is evaluated by determining whether the sequencing run meets the Illumina specifications for quality scores and data output. Actual run performance will vary based on sample type, quality, and clusters passing filter. Specifications are based on the Illumina PhiX control library at supported cluster densities.
Where can I find instrument specifications?
Follow the links below to the instrument specification pages:
iSeq 100 | MiniSeq | MiSeq | MiSeq i100 Series | NextSeq 500/550 | NextSeq 1000/2000 | HiSeq 3000/4000 | NovaSeq 6000 | NovaSeq X/X Plus
The Sequencing Analysis Viewer (SAV) is a free software used to assess the performance of sequencing runs, and can be downloaded from the Illumina website:
SAV v3.0 Supports NovaSeq X Series and NextSeq 1000/2000 XLEAP runs
SAV v2.5.12 Supports NextSeq 1000/2000 on Control Software v1.5 and later (except for XLEAP reagents)
SAV v2.4.7 of SAV on all instruments except on-instrument MiSeq and NextSeq1000/2000; SAV v2.4.7 is compatible for all off-instrument (remote) use running Windows 7 or later
SAV v1.8.37 of SAV for on-instrument MiSeq viewingOnce SAV is installed, open it and select the tab containing the desired query information.
How do I determine if my run meets spec?
Below is an example of a PhiX validation run (2 x 151 bp) on the MiSeq, using v2 reagents. The specifications for this run are as follows:
Total data output of 4.5-5.1 gigabases (Gb)
At least 80% of bases called with a quality score of 30 or higher (at least 80% ≥ Q30)
To determine the quality score, review the Analysis tab Q score Distribution chart and the Summary tab as shown below.
Analysis Tab:
Summary Tab:
The quality specification for a MiSeq paired-end 151-cycle run is Q30 ≥ 80%. The run meets this specification, as the percent ≥ Q30 is >94%.
To determine the yield of the run, review the information in the Summary tab as shown below.
The yield specification for a paired-end 151-cycle run is >4.4 Gb. The run meets this specification, as the total yield is 6.10 Gb.
The following images are from : “MiSeq: Nextera DNA Flex (replicates of E. coli, B. cereus, and R. sphaeroides)”. Note: Nextera DNA Flex has been renamed to .
Analysis Tab: Overview of the run metrics.
Imaging Tab: Displays thumbnails from the run if available.
Summary Tab: Provides basic data quality metrics summarized per lane and per read.
Indexing Tab: Total and Per Sample % Reads Identified if a sample sheet was used and demultiplexing was performed.
Additional Resources:
BaseSpace Sequence Hub (BSSH) is the Illumina cloud-based platform for data management, storage, and analysis. There are three BaseSpace Sequence Hub subscription tiers - Basic, Professional, and Enterprise. The Workgroup feature for the Professional and Enterprise tiers gives BaseSpace Sequence Hub users access to pooled resources. A workgroup consists of users who share data, storage space, and other resources. Only the workgroup administrator (admin) can add users to a workgroup, as described in the steps below.
Log into BaseSpace Sequence Hub. Switch to the workgroup by selecting the user name in the top right corner and select the workgroup. Select the user name again and select Settings. Then select manage workgroups.
Select the workgroup to which you want to add users to (ILMN_TechSupport is the name of the workgroup in this example).
Select USERS on the left panel. Do not use the Invite option on the Administrators screen. The Invite option will invite the user as an admin only. A Professional workgroup can have only one admin.
Select Invite.
Add the BaseSpace Sequence Hub User IDs of your collaborators and make sure that Has Access to Sequence Hub - US (or EU, for the European Union instance) is selected. Then select Grant access
Enterprise domain users only: There are two options to invite users either via a collaborative Enterprise domain account or via public Illumina account
After configuring new users, go to the Users tab via to have access to a list of all the users invited and their respective permissions to different applications in a workgroup. "Has Access" will appear for applications the user can access, while a dash will indicate applications the user does not have access to.
Users can be selected to open a detailed view showing which workgroup the user is part of and the applications those workgroups have access to.
To change permissions, select the "Change Access" option in the top right corner.
For all Illumina Sequencers, the Instrument Serial Number is embedded into the Run ID. The Run folders in the Temp and Output folders are titled with the Run ID by default in the following format:
YYMMDD___
Specific Serial Number Locations for Each Instrument
iSeq 100:
The Temp Run folderis located at D:\Illumina\iSeq Runs[Runfolder].
Using TeamViewer for remote desktop shares requires a one-time download of the TeamViewer QuickSupport application. Navigate to the appropriate TeamViewer QuickSupport support site for , , or OS (depending on which OS is on the computer you want to share the desktop from) and scroll down to find the download icon for the TeamViewer QuickSupport application. Select the download icon to download the software installer. The Linux option will directly download your software installer.
After it has been downloaded onto an Illumina instrument or personal computer, follow the instructions for the appropriate operating software to install the application on your desktop.
Installation on a Windows OS
Instruments that use patterned flow cells have artificially lower percent clusters passing filter (%PF) metrics compared to non-patterned flow cells.
With patterned flow cells, there is no template generation or preliminary filtration step during image analysis, which results in lower %PF values.
Because template generation and the associated preliminary filtration steps are not applied, all nanowells, including empty wells or clusters that may be dim, low quality, or polyclonal are included in the raw cluster count, which leads to lower %PF values.
PhiX-Index4
AATCACCAGC
CAGTAATTAC
GTAATTACTG
PhiX-Index5
AGCGAATTAG
GGCGATCAGA
TCTGATCGCC
NextSeq 500/550 High Output reagents
1.8 pM
170-220K clusters/mm2
NextSeq 500/550 Mid Output reagents
1.5 pM
170-220K clusters/mm2
NextSeq 1000/2000 (Onboard, Standard chemistry, XLEAP chemistry P1/P2)
650 pM**
N/A*
NextSeq 2000 (Onboard, XLEAP chemistry, P3/P4 and 600-cycle P1/P2)
450pM**
N/A*
NovaSeq 6000 - Standard Workflow
250 pM**
N/A*
NovaSeq 6000 - XP Workflow
100 pM**
N/A*
NovaSeq X - 1.5B/10B
140 pM**
N/A*
NovaSeq X - 25B
140 pM**
N/A*
MiSeq i100
120 pM**
N/A*


For any feedback or questions regarding this article (Illumina Knowledge Article #2874), contact Illumina Technical Support [email protected].


Downgrade Log On As accountfrom an administrator to a standard account (may impact some LRM Modules) OR...


For any feedback or questions regarding this article (Illumina Knowledge Article #1922), contact Illumina Technical Support [email protected].


1. Does the overall quality (Q30) score meet specification?
2. Does the total data output meet specification?**What additional information can I obtain from SAV?** 1. Flow Cell Chart shows color-coded metrics per tile for the entire flow cell.
2. Data by Cycle displays various metrics for each cycle of the run. Select the displayed metric, lane, surface, and channel using the drop-down lists.
3. Q Score Distribution shows a quick overview of the quality of the run. The Q30 for the whole run is found in the upper right of this box.
4. Data by Lane shows plots of metrics per lane.
5. Q score Heatmap displays a heat map for Q score by cycle. 1. Toggle which base or color channel image to view here.
2. If thumbnails are saved for the run, they are displayed here. 1. Run summary per read, including quality, is reported here.
2. More details per read including the exact density, clusters Passing Filter (PF), and % aligned. 1. Metrics for the entire run. Note: % Reads Identified will not include any PhiX because PhiX is not indexed.
2. Metrics per sample, using indexing information from the sample sheet.
3. Graph plotting the percent of reads identified for each sample present in the sample sheet. The iSeq 100 Serial Number can be found in the control software in the About Menu or the upper left-hand corner of the control software.
The iSeq 100 Serial Number can be found on a sticker under the bottom front door, where the leak pad is located, or behind the air filter.
MiniSeq:
Temp Run folder is located at D:\Illumina\MiniSeq Sequencing Temp<run folder>
The MiniSeq Serial Number may be found in the MiniSeq Control Software in the About Menu or the upper left-hand corner of the control software.
From control software home screen, Navigate as follows: Manage Instrument > About > Instrument ID.
** **
MiSeq:
Temp Run folder is located at D:\Illumina\MiSeqTemp[Run Folder]
In MiSeq Control Software (MCS) v4.0 and later:
The MiSeq Serial Number is located in the upper left-hand corner of the control software.
The MiSeq Serial Number may also be located on the back of the instrument.
NextSeq 500/550:
Temp Run folder is located at D:\Illumina\ NextSeq Control Software Temp<Run_Folder>
In NextSeq Control Software (NCS) 4.0 and later, The Instrument Serial Number may be found in the About Menu or the upper left-hand corner of the control software.
From the control software home screen, Navigate as follows: Manage Instrument > About > Instrument ID.
The NextSeq 500/550 serial number may also be located on the back of the instrument near the bottom.
NextSeq 1000/2000:
The Temp Run folderis located at /usr/local/Illumina/runs/[runfolder].
In the NextSeq Control Software, the serial number is located at the bottom of the home screen. Users may also navigate as follows: Hamburger Menu (Upper Left-Hand Corner) > About > Instrument Serial Number.
NovaSeq 6000**:**
The Temp Run folder(both sides) is located at C:\ProgramData\Illumina\NovaSeq\NovaSeqTemp[run folder]
The NovaSeq Serial Number is located in the upper left-hand corner of the control software.
The NovaSeq Serial number is also located on the back of the instrument next to the label.
NovaSeq X Series:
The Temp folder is under the /usr/local/illumina/runs/ folder.
In the NovaSeq X Control Software, the Serial Number is also listed at the path Instrument Icon > Settings > About.
MiSeq i100 Series* The MiSeq i100 Series serial number can be found in the settings menu by selecting the menu> About > Serial Number:
The serial number can also be found on the back of the instrument near the ethernet ports
For any feedback or questions regarding this article (Illumina Knowledge Article #6351), contact Illumina Technical Support .
Installing on a Mac OS
Save the installer to the local system.
Locate and double-click installer to initiate installation.
Follow prompts to complete installation.
Locate the application and double-click to launch once installation completes.
Tip: Create a shortcut for TeamViewer QuickSupport on the desktop for easy access.
Installing on a Linux OS
The NextSeq 1000/2000 computer is currently the only Linux-based Illumina instrument. TeamViewer QuickSupport is installed by Field Service Engineers during instrument installation. If you encounter issues with the TeamViewer QuickSupport software on a NextSeq 1000/2000, use the following instructions to install it. The Teamviewer for Linux quick support tool can be directly downloaded here.
Save the downloaded folder (teamviewerqs) to the desktop.
Extract by right-clicking and selecting open with Archive Manager.
Highlight folder and choose to extract.
Navigate to the desktop for the extract to location and choose to extract.
After it has been extracted, open the folder and double-click “teamviewer.desktop”.
A TeamViewer desktop shortcut will be created within the folder, which can be saved on the desktop.
Sharing your Desktop with Illumina Support
When setting up a remote desktop share session with Illumina support, double-click the QuickSupport application icon on your desktop.
After the application has launched, you will see a QuickSupport window that includes Your ID and Password. Provide Your ID and Password to the Illumina Support team to set up the remote desktop session.
Your ID is specific to the computer/instrument the application is installed on and will not change. Your Password will change every time the TeamViewer QuickSupport application is launched. Illumina support can only connect to your computer if the TeamViewer QuickSupport application is open and they have your current Password.
When using TeamViewer QS, the Software Restriction Policies (SRP) Windows feature must be disabled to run this program. SRP must be disabled each time TeamViewer is run unless TeamViewer is added as an exception to SRP. Follow instructions outlined in How to disable and add Exceptions to the Software Restriction Policies (SRP) for TeamViewer in Windows 10 Operating System (OS) bulletin to disable SRP and add TeamViewer QS as an exception.
If you are interested in learning more about the security of using TeamViewer, see the TeamViewer Security Site.
For any feedback or questions regarding this article (Illumina Knowledge Article #3599), contact Illumina Technical Support .


The uniform feature sizes and optimal spacing in the patterned flow cell enable significantly increased cluster density for patterned flow cells, ultimately resulting in a greater yield capacity.
Although the percent passing filter metric is generally lower with patterned flow cells, it does not negatively impact performance or data quality.
Consult the specifications for the instrument and sequencing configuration to evaluate run performance, quality, and data output.
For further information, see the technical note Calculating Percent Passing Filter for Patterned and Nonpatterned Flow Cells.
For any feedback or questions regarding this article (Illumina Knowledge Article #7457), contact Illumina Technical Support .
When returning to the lab after an extended shutdown or inactivity, it is important to make sure all lab resources are up and running and ready to be used. Below are best practices to check library prep, sequencing and microarray reagents and instruments to ensure a successful reopening.
Laboratory and Reagent Checks
Wipe down all lab surfaces with 10% bleach to remove any accumulated dust or contaminants.
Pay particular attention to typical ‘hot spots’:
Benchtops used for processing amplified DNA
Door handles
Refrigerator and freezer door handles
Computer keyboard and mouse
Centrifuges, vortexers, and thermal cyclers
Clean all equipment in any pre-amp areas (including pipettes)
Refer to the bulletin for additional details
Proper storage and handling of reagents, kits, and user-supplied materials should be followed according to documented procedures.
Check connectivity to network drives or servers used for file storage (output run folders, manifest files, cluster files, DMAPs) or data processing (IDAT repository).
Sequencing Instrumentation Considerations
Instrument System Guides: | | | | | | |
For instruments that were left on:
Confirm the recommended maintenance/manual/standby washes were performed per the appropriate system guide.
Perform a full power cycle, following the steps in the system guide.
Leave system off for at least 5 minutes before powering back on.
Note: While the iSeq 100 and NextSeq 1000/2000 do not have onboard fluidics, a power cycle is recommended for these instruments as well.
For instruments that were turned off:
Power on the instrument and make sure that the control software initializes.
Perform two maintenance/manual washes to rehydrate the fluidics system (excluding iSeq 100 and NextSeq 1000/2000).
Note: If an additional maintenance/manual/standby wash using laboratory-grade water was not performed prior to instrument shutdown, perform three maintenance/manual washes to rehydrate the fluidics system, then run System Checks to test the fluidics delivery. System Check details are found in the appropriate system guides.
Library Preparation Considerations
Starting a New Library Prep
When starting new library preparation, Illumina recommends reviewing the best practices for the specific library prep kit being used. This information is found on the appropriate product support page.
Proceeding to a Sequencing Run with Stored Libraries
For any Illumina library that has been stored for longer than the recommended time, as specified in the reference guide, Illumina recommends repeating quality control (QC) and quantification prior to sequencing. Re-QC is beneficial because libraries can degrade during prolonged storage, leading to loss of overall yield. Recommended QC methods for most Illumina libraries are summarized in the support bulletin.
For libraries requiring bead-based normalization, Illumina recommends storing the library at the last safe stopping point, just prior to the bead-based normalization step, as specified in the protocol guide. Libraries stored as double stranded DNA (dsDNA, before bead-based normalization) are more stable than libraries stored as single stranded DNA (ssDNA, after bead-based normalization). If a library has been stored long term after bead-based normalization, Illumina recommends repeating the bead-based normalization of the original dsDNA library.
Infinium Assay Considerations
Refer to and the appropriate Infinium Assay Reference Guide to make sure that all equipment and hardware are present and in good working condition.
Note the duration and temperature recommendations for MSA plate storage stated in the ‘Safe Stopping Point’ portions of the .
Check stocks of user-supplied materials (eg, cap mats, 96-well plates, gloves, etc.) that may have been consumed by other groups using the space in the interim.
Te-Flow and Water Circulator:
Confirm that there is no microbial growth in the water circulator and that the water is at the proper fill level.
If microbial growth is present, see the following instructions for cleaning the water circulator and refresh with algicide if needed: .
Do not use chlorine bleach to clean the water circulator.
Tecan/Illumina Automated Pipetting System (IAPS):
If the Tecan fluidics were stored dry, refill the system water carboy.
Empty the waste liquid container and disposable tip waste bag, if necessary.
Make sure that the Te-Flow is seated correctly in the pan, and that the Te-Flow is in the appropriate location on the Tecan deck.
iScan
Power on the scanner and make sure that the Archimedes drive appears on the PC before launching ICS software.
Clean the BeadChip carriers and iScan Nest (tray that carrier is placed on) with an Ethanol wipe to remove any dust or built up residue.
Turn on the scanner at least 30 minutes before use to give the lasers time to warm up.
Instrument control software contains several different Illumina Windows Services
Illumina Universal Copy Service
Illumina Local Run Manager Job Service
Illumina Local Run Manager Analysis Service
By default, the Illumina Windows Services are configured to Log On As a predefined Windows service account called Local System. Successful data transfer from the instrument to a network output location requires that the Illumina Windows Services be reconfigured to Log On As a different local Windows account.
Services are usually reconfigured to Log On As the standard local sbsuser account, which exists on all instruments. You may also choose to run the services using a different account (on-domain or local).
Note: Illumina Universal Copy Service must be configured to log on as a standard (non-administrator) Windows account.
The Log On As account (typically sbsuser) must have read/write access, or cached credentials with read/write access, to the network storage destination.
It must have at least “read only” or “list folder content” permissions to all parent folders within the UNC path.
In the example of \server\level1\level2, the account must have access to the “level1” folder.
If on LRM v3.x:
Search for Services in the taskbar and open the app with right-click and Run as administrator.
Enter administrator account credentials (by default this will be sbsadmin) in the pop-up window.
Locate the Illumina services.
Illumina Local Run Manager Job Service
Illumina Local Run Manager Analysis Service
In Local Run Manager (LRM), configure the Illumina services to use the respective Log On As accounts via the admin account by accessing the Tools menu.
Go to System Settings, select Service Accounts and select the respective option for each Service (note that Illumina recommends that Universal Copy Service (UCS) is ALWAYS configured to use the sbsuser account).
Log in to the instrument as the Log On As account configured above (typically sbsuser).
Open File Explorer and enter the network output location (in UNC format) into the address bar.
Enter the credentials of the desired user who has access to the desired network storage location into the Windows Security prompt. It may be necessary to work with the local/lab IT team for assistance with these credentials.
In Windows File Explorer, right click within the intended Network Output location and select New > Text Document to create a new document called test.txt.
Delete the file just created.
If either of the actions above fails, the account does not have write permissions on the Network Output location. Work with the local/lab IT team to configure the Network Output location with appropriate permissions.
Instrument Control Software
Set the Output Folder location as full UNC path (with trailing backslash) in the Instrument Control Software.
Local Run Manager
Refer to the article and the section To import data to a new analysis module. Import a run to be able to set the Base Output Folder to the network location. Enter the network location as the full UNC path.
FAQ
Changing Windows Account Passwords If the Windows account passwords change, the credential configurations will also need to be updated by repeating this process for all Illumina Windows Services using the new password. Failure to update the password can cause connectivity issues and failures during sequencing runs.
How to access the full UNC path of a mounted drive
Launch the Windows Command Prompt app
Enter the command net use
This will display the full UNC path to all network drives mounted on the system
在NextSeq500/550 和MiniSeq测序系统上对混合文库进行index测序时,非常重要的一点是要选择合适的index组合,否则可能会因为在读index时簇定位失败而导致index测序失败。本篇bulletin将针对NextSeq 和MiniSeq系统提供样本混合方针。
双通道测序
NextSeq 500/550和MiniSeq 测序系统只需要2张图片就可以区分4种碱基:一张图片来自红光通道,另一张图片来自绿光通道。不同于每种碱基各带一种单独的荧光标记的四通道测序,双通道测序使用两种荧光染料,C碱基标记红色,T碱基标记绿色,A碱基同时标记红色和绿色,G碱基没有荧光标记。
图1:双通道SBS荧光成像(假彩色图片仅是效果图)。为了提高4种DNA碱基的检测速度,MiniSeq和NextSeq500/550只用了2个图像分别捕捉红色和绿色波段的信号。仅在红色或绿色图像检测到的cluster分别被转译为C和T碱基。同时在红色图像和绿色图像被检测到的cluster被转译为A碱基,在两张图片中都没有检测到信号的cluster将被认为是G碱基。
Index的考量
Index reads中前两个循环必须至少有一个碱基不是G。如果index read前面两个碱基都是G,就会由于没有荧光信号导致cluster定位失败,所以Index的前两个循环中必须有一个碱基有信号才能确保index的正常拆分。
选择index进行组合时,每个循环都至少有一个通道有信号,最好是两个通道都有信号。
红色通道对应A或者C碱基
这样碱基读取的过程才能确保数据分析的精确。
Index组合的例子: 理想的index组合:每个循环需要两个通道都有信号。
可接受的index组合:只有一个通道有信号,但是仍然有足够的信号进行测序。
不好的index组合:index read前两个碱基都是G,没有信号产生,导致cluster定位失败。
✔= 两个通道均有信号。注意,A碱基在红色和绿色两个通道中均有荧光。
✔= 只一个通道有信号,可接受的组合。
✖= 两个通道中均没有信号。
点击 获得更多双通道测序的信息。
Recently, several vulnerabilities around the Remote Desktop Protocol (RDP) within Microsoft Windows systems were disclosed (Bluekeep and DejaBlue). While these vulnerabilities apply to all Illumina systems, there have been no reported infections of Illumina systems.
How to Secure Your Systems
As recommended in the Illumina Security Best Practices Guide, RDP should be disabled on all Illumina instruments.
More details about the BlueKeep vulnerability can be found here.
Note: the BlueKeep RDP patch applies to only instruments running on Windows 7, while DejaBlue RDP patch applies to all instruments and Windows operating systems.
For DejaBlue, Illumina recommends the application of the specific patch for your instrument. Use the table below to select the appropriate patches. Due to prerequisites, the patches should be installed in numerical order (eg, Patch 1 first, Patch 2 second, Patch 3 (as applicable) last).
The security of your data and systems is paramount to Illumina. If you have additional questions regarding security recommendations from Illumina or about RDP on your Illumina systems, refer to the page on the Illumina website or contact [email protected].
Illumina测序的运行时间包括簇生成、边合成边测序化学循环、双端化学反应和清洗步骤。此外,使用非Pattern模式的flow cell的运行在构建模板时会暂停一段时间。为了帮助规划测序工作流程和预测整体运行时间,表1根据Illumina测序平台和试剂版本总结了每个测序步骤的预估时长。
Instruments with Windows 10 OS have the Software Restriction Policies (SRP) Windows feature enabled by default. This security feature blocks programs that are not specifically on the SRP exceptions list. When using TeamViewer QS, an exception must be added to SRP to allow TeamViewer QS to launch properly.
How to disable SRP
Confirm that a sequencing run is not in progress because this process could interrupt the run.
Log in to the system with the sbsadmin
The following table details the thermal output and power rating for Illumina sequencers. More information is available in the Site Prep guide for each respective instrument.
*Excludes UPS (uninterrupted power supply) output.
Thoroughly wash glass back plates that may have accumulated dust or residue during the time of disuse. See the Technical Bulletin Improve Infinium data with these updated XStain glass back plate care recommendations for details.
Check the waste tubing lines of the Te-Flow and white reagent pan. Bleach can be squirted through the waste tubing lines leading to the waste carboy to clean them, if needed.
If the waste carboy has been emptied or moved, make sure it is back in its proper position, with an unimpeded, gravity-driven flow of waste from the Te-Flow Reagent pan to the waste carboy. Make sure that waste tubing is not kinked and there are no ‘uphill’ runs to the waste carboy.
Refer to the following sections in the Infinium Assay Lab Setup and Procedures Guide under Robot Usage and Maintenance:
Preparing the Infinium Automated Pipetting System for Use (perform at least two bleach washes)
Note: if the system was idle for a long time and/or dried out prior to shut down, multiple System Wash cycles are needed to purge all air from the fluidics.
Testing Volume Accuracy of the IAPS Tips
For any feedback or questions regarding this article (Illumina Knowledge Article #3153), contact Illumina Technical Support [email protected].
Operating System
PATCH 1
PATCH 2
PATCH 3
Windows 10
2019-09 Servicing Stack Update for Windows 10 Version 1607 for x86-based Systems (KB4512574)
2019-07 Cumulative Update for Windows 10 Version 1607 for x64-based Systems (KB4512517)
N/A
Windows 7
2019-09 Security Update for Windows Embedded Standard 7 for x64-based Systems (KB4474419)
2019-03 Servicing Stack Update for Windows Embedded Standard 7 for x64-based Systems (KB4490628)
2019-08 Security Only Quality Update for Windows Embedded Standard 7 for x64-based Systems (KB4512486)
For any feedback or questions regarding this article (Illumina Knowledge Article #1933), contact Illumina Technical Support [email protected].
For any feedback or questions regarding this article (Illumina Knowledge Article #8388), contact Illumina Technical Support [email protected].


Do not use a mapped network drive path (such as Z:).
Do use the full UNC path to the output folder (with preceding double backslashes and a trailing slash, such as \server\level1\level2\ )
The network storage destination must have enough storage for the run. The amount of storage needed can vary by flow cell type and instrument. Reference the article Approximate sizes of sequencing run output folders for estimates.
Select Properties and navigate to the Log On tab.
Select This account and browse to search for the account. In the Select User window, select Advanced and then Find Now. Select the desired Log On Account (generally sbsuser) from the search results.
Select OK to acknowledge both windows.
Enter the password for the selected account (typically the account is sbsuser), select Apply and OK.
Restart the service by right clicking and selecting Restart.
Repeat steps 4 - 8 for the Local Run Manager (LRM) services below (Note: some LRM modules may need to Log On As an administrator account)
Select Remember my credentials, then select OK. This will add the network storage credentials to the Windows Credential Manager.
Open the Credential Manager application in Windows. Verify that the credentials entered above have been cached to in the Windows Credentials. Note: If these credentials change, the cached credentials must be updated in order to continue output to your network storage.
For any feedback or questions regarding this article (Illumina Knowledge Article #1934), contact Illumina Technical Support [email protected].


For any feedback or questions regarding this article (Illumina Knowledge Article #7297), contact Illumina Technical Support [email protected].


N/A
52 分钟
无需清洗
MiniSeq
90分钟
3.5
运行继续
60 分钟
75分钟
MiniSeq
(快速运行)
整体运行时间:
单index, 1x 101 -5.1小时
双index, 1x 101 -5.7小时
N/A
运行继续
N/A
N/A
MiSeq v2
60分钟
Nano = 2.5
Micro = 3
Full = 4.5
运行继续
31 分钟
运行后清洗20分钟,模板管路清洗30分钟,维护清洗90分钟
MiSeq v3
70分钟
6
运行继续
50 分钟
运行后清洗20分钟,模板管路清洗30分钟,维护清洗90分钟
MiSeq i100系列
~ 120分钟
~ 1分钟
N/A
~ 60 分钟
N/A
NextSeq 500/550 (中通和高通试剂)
2.5小时
4.6
运行继续
60 分钟
90分钟
NextSeq 1000/2000 P1-标准
3.75小时
2.5
N/A
40 分钟
可选择性清除试剂:
1.5小时**
NextSeq 1000/2000 P2-标准
4小时
4.7
N/A
40 分钟
可选择性清除试剂:
1.5小时**
NextSeq 1000/2000 P3-标准
4小时
8.4
N/A
45 分钟
可选择性清除试剂:
3小时**
NextSeq 1000/2000 P1-XLEAP
4小时
1.7
N/A
74 分钟
可选择性清除试剂:1.3-3.2小时**
NextSeq 1000/2000 P2- XLEAP
4小时
3.4
N/A
74 分钟
可选择性清除试剂:
1-3.2小时**
NextSeq 1000/2000 P3- XLEAP
5小时
6.4
N/A
80 分钟
可选择性清除试剂:1.4-2.7小时**
NextSeq 1000/2000 P4- XLEAP
5小时
7.4
N/A
80 分钟
可选择性清除试剂:1.4-2.7小时**
NovaSeq 6000
180分钟¤
SP/S1 = 3.5 S2 = 5 S4 = 6.75
N/A
48 分钟
运行后清洗=80 分钟
维护清洗=80分钟
NovaSeq X系列
1.5B = 5小时 10B = 4.8小时 25B = 5.8小时
1.5B = 2.2分钟 10B = 2.7分钟 25B = 6.1分钟
N/A
1.5B = 67分钟 10B = 48分钟 25B = 84分钟
运行后清洗=110 分钟(1.5B流动槽清洗耗时180 分钟)
维护清洗=180分钟(1.5B流动槽不可用于维护清洗)
For any feedback or questions regarding this article (Illumina Knowledge Article #7137), contact Illumina Technical Support .
仪器
测序仪器上簇生成
每个循环的时间(分钟)
模板构建暂停时间*
双端测序反转时间
运行后清洗/维护清洗
iSeq 100
5小时
2.2
Open Windows File Explorer and navigate to the C:\Illumina\Security folder.
Double-click Disable.reg and acknowledge the prompts.
To reenable SRP, double-click Enable.reg and acknowledge the prompts.
Note 1: For NovaSeq 6000 with serial numbers smaller than A01535, the sbsuser account is part of the Administrators group so no need to switch accounts.
How to add exceptions for TeamViewer to SRP
Confirm that a sequencing run is not in progress because this process could interrupt the run.
Log in to the system with sbsadmin local account (see Note 2 below).
Disable SRP by navigating to C:\Illumina\Security, double-clicking Disable.reg, then acknowledge the prompts.
In the Windows search bar, type in secpol and open the Desktop App.
In the Local Security Policy dialog box, expand Software Restriction Policies, then select Additional Rules.
To add a rule:
On the Action menu, select New Path Rule….
In the Path field, enter the certificate, file name, file extension, or directory that you want to allow.
Separately add the following rules according to the previous instructions for both of the following paths:
TeamViewerQS*.exe
C:\Users\\AppData\Local\Temp\TeamViewer\
Close the Local Security Policy dialogue box.
Reenable SRP by navigating to C:\Illumina\Security, double-click Enable.reg, then acknowledge the prompts.
Sign out of sbsadmin account and then sign back in as sbsuser for the settings to take effect.
Note 2: For NovaSeq 6000 with serial numbers smaller than A01535, the sbsuser account is part of the Administrators group so no need to switch accounts.
Figure 1. Double-click Disable.reg to disable SRP.
Figure 2. Select Yes to acknowledge the prompt.
Figure 3. Select OK to acknowledge the prompt.
Figure 4. Open Local Security Policy to add exceptions for TeamViewer to SRP.
Figure 5. Expand Software Restriction Policies and then select Additional Rules.
Figure 6. Select Action and then select New Path Rule...
Figure 7. Under Path select TeamViewerQS.exe and in the Security level select Unrestricted.
For any feedback or questions regarding this article (Illumina Knowledge Article #6523), contact Illumina Technical Support .
Maximum supported read length
Illumina platforms and sequencing kits allow for a variety of sequencing applications. To ensure the highest level of quality, Illumina supports reads up to a certain length depending on the sequencing platform and SBS kit version; refer to How many cycles of SBS chemistry are in my kit?. It is possible to choose a longer read length during run setup in Local Run Manager (LRM) or the instrument control software. However, when the read length exceeds the supported length Illumina cannot guarantee maintaining high data quality.
Table 1. Maximum supported read length for sequencing platforms and SBS reagent kits.
* MO: Mid-output / HO: High-output ** Rapid Run
Maximum read length for index reads
Instrument control software: enter custom Index Read length during run setup for certain instruments, as shown below in Table 2.
LRM v2: enter up to 100 characters for the maximum index cycles (see for additional information on custom libraries with Local Run Manager).
LRM v3: enter up to 20 characters, or use manual mode to allow for between 20 and 100 bp.
LRM v4: enter up to 20 characters, or use manual mode to allow for between 20 and 1000 bp.
To make sure sequencing quality of the Index Read remains as expected, do not exceed the supported read length.
Table 2. Maximum individual index length for sequencing platforms.
*When setting up runs in Cloud mode, index length is limited by the BCL Convert limitations listed below.
**For index length between 20-1000 bp, use manual mode as LRM v4 is limited to 20 bp.
***index length is not limited for runs set up in manual mode without analysis
Note: BCL Convert has its own index limitations. BCL Convert 4.2 or lower is limited to 27 index cycles total. For BCL Convert 4.3 and higher, the index length has been increased to 27 cycles for each index read.
If using the bclconvert override cycle settings, bases specified for UMIs (U) in the index reads will not count for the maximum index length.
表1:每台测序仪和该仪器支持试剂的每个测序步骤的大致时间
* 模板构建时间会根据簇密度而变化
¤ XP的工作流程大约是150分钟,因为省略了ExAmp的步骤
# 在这些运行中第2-5个循环可能需要大约25分钟/每个循环
** 清除试剂的时间根据循环次数而变化


[Optional] In the Description field, enter a reason for creating the rule.
Select OK to add the rule.


For any feedback or questions regarding this article (Illumina Knowledge Article #2826), contact Illumina Technical Support [email protected].


Instrumentation > General > Reference Material
This article provides detailed instructions for shutting down and maintaining Illumina instruments in the event of lab closure. Lab closure reasons may include but are not limited to public health events, natural disasters, or government closures.
Perform a maintenance/manual/Standby wash (Standby wash for MiSeq only) using Tween 20 and NaOCl (if applicable), instructions are found in the instrument system guides.
Perform another maintenance/manual/Standby wash (Standby wash for MiSeq only) using laboratory-grade water to remove Tween from the system.
If possible, perform the above steps every 30 days.
Shut down procedures:
If employees will be in the lab, leave instrument powered on while idle.
If lab is completely shutting down (no employees on site or possibility of power being shut off), power off the instrument via normal processes in the instrument system guide.
Keep the instrument off until normal work schedules permit.
Power on the instrument.
Perform two maintenance/manual washes to rehydrate the fluidics system.
Note: If additional maintenance/manual/Standby wash using laboratory-grade water was not performed prior to instrument shutdown, perform three maintenance/manual washes to rehydrate the fluidics system and run system checks to test the fluidics delivery.
In the event of an extended laboratory shutdown, the MiSeq instrument can be placed into Standby mode by performing a Standby wash. When in Standby mode, perform additional Standby washes every 30 days that the instrument is idle. To switch the instrument out of Standby mode, perform a power cycle (follow the shutdown instructions below and wait at least 1 minute before toggling the power switch back on) and then a Maintenance wash. If the instrument has been idle for a significant period, additional Maintenance washes can be performed to ensure that the fluidics system is ready for a sequencing run.
Instructions for performing Standby and Maintenance washes are found in the .
Shutdown the Instrument:
Close MiSeq Control Software.
Make sure that no other programs are running, then shut down your PC from the Windows Start button.
After the PC has shut down, toggle the power switch at the back of the MiSeq to turn off the instrument.
MiSeq i100
Steps to idle the MiSeq i100:
Eject the used consumables. Refer to .
Open the used reagent door and empty the waste bottle. Refer to and .
From the Control Software Home screen, select the menu icon in the upper-left corner.
For the NextSeq 500/550, perform a Quick wash every 14 days that the instrument is idle, leaving the reagent wash cartridge and buffer cartridge in place.
Instructions for performing the Quick Wash are found on Page 36 of the .
Shutdown the Instrument:
Select Manage Instrument. Note: To shutdown the NextSeq 550Dx instrument in research mode, see NextSeq 550Dx Reboot and Shut Down Options on page 67 of the .
Select Shutdown Options.
Select Shutdown.
For the MiniSeq instruments, perform a Quick wash every 7 days that the instrument is idle, leaving the reagent wash cartridge and buffer cartridge in place.
Instructions for performing the Quick Wash are found on Page 26 of the .
Shutdown the Instrument:
Select Manage Instrument.
Select Shutdown Options.
Select Shutdown.
Because the fluidics system on the iSeq 100 is housed within the reagent cartridge, no additional steps are required for idling the iSeq 100. For extended closures, shut down the instrument by navigating to the hamburger menu in the top left corner of the Control Software and selecting Shutdown System. After the instrument has been shut down, toggle the power switch on the back of the instrument to fully power down the system.
More information on the iSeq 100 is found in the .
Because the fluidics system on the NextSeq 2000 is housed within the reagent cartridge, no additional steps are required for idling the NextSeq 2000.
Shutdown the Instrument:
Eject used reagent cartridge from instrument prior to shutting down NextSeq 1000/2000.
From the menu, select Shut Down Instrument.
If the system does not shut down, hold the power button on the right side of the instrument until the lights fade.
More information on the NextSeq 1000/2000 can be found in the .
The NovaSeq 6000 instrument requires a maintenance wash every 14 days that instrument has been idle or if a four-lane run with an automatic post-run wash has not been completed within the previous 14 days.
Instructions for performing the Maintenance wash on the NovaSeq 6000 instrument are found on Page 61 of the .
If employees will be in the lab, leave NovaSeq 6000 powered on while idle. If lab is completely shutting down, power off the NovaSeq 6000.
Shutdown the instrument:
Choose Instrument Shutdown from NovaSeq Control Software hamburger menu.
When monitor shuts down, use the toggle switch at rear right to switch off the instrument.
If the NovaSeq X/X Plus will be idle for more than 2 days, the instrument should be left as-is after the most recent sequencing Post-Run Wash completes (with a used reagent cartridge and used flow cell present). This will prevent the fluidics system from drying out.
In the event of an extended instrument shutdown (>14 days), follow the instructions below:
Leave the used sequencing consumables from the most recent sequencing run in place after the Post Run Wash completes.
Do not remove the used flow cell or sequencing reagent cartridge.
Remove and dispose of the the spent reagents in the large and small waste bottles as detailed in the
Shutdown the iScan System:
Remove BeadChips.
Open the iScan Reader tray.
To remove the carrier, lift it straight up and out of the tray.
For more information on maintenance or shutting down the iScan instrument, refer to the .
Preparing the Tecan for extended idle period:
Follow Cleaning the Tecan instructions from the .
After washing with 10% bleach.
Fully remove the bleach solution from the carboy and refill with lab-grade water.
If lab personnel will be available, leave the Tecan powered on.
If no lab/institution personnel will be available, power off the Tecan.
Powering off the Tecan:
Dry out the Tecan fluidics system.
Empty out the water tank.
Run two system washes to dry out the lines.
Upon permanently returning to work:
Power on the Tecan.
Refer to the following sections in the under Robot Usage and Maintenance.
Preparing the Robot for Use (perform at least two bleach washes).
Testing Volume Accuracy of the Tecan Tips.
For more information on maintaining or shutting down the Tecan instrument, refer to the .
When prompted, select Yes, shut down instrument.
Wait until the screen is powered off, then toggle the power switch on the back-right corner of the instrument to OFF.
The Shutdown command safely shuts down the software and turns off instrument power. CAUTION: Do not relocate the instrument. Moving the instrument improperly can affect the optical alignment and compromise data integrity. If instrument relocation is necessary, contact your Illumina representative.
Power off the NovaSeq X /X Plus instrument
From the NovaSeq X Series Control Software Home screen, select the instrument icon to open the global navigation menu, and select Settings.
From the Settings menu, select Shutdown
Wait 2 minutes for the instrument computer to power down and the monitor is dark.
Toggle the power switch to the off position on the back right side of the instrument.
Perform a maintenance wash before using the instrument for sequencing again as detailed in the NovaSeq X Plus Product Documentation
Select the menu button in the upper left corner of the screen.
Select Exit.
From the Windows Start menu on the iScan System computer, select Shutdown.
Toggle the Power switch on the back panel of the iScan Reader.
Repeat above steps every 30 days if possible, otherwise leave the system powered off.
Powering off the Tecan.
Power down the water circulator.
Drain the water tubing to and from the Te-Flow.
Rinse the Te-Flow pan with water and let drain to waste.
Empty waste container.
Shut down the Illumina Automation Control (IAC) software.
Shut down the computer.
Power down the Tecan.
For any feedback or questions regarding this article (Illumina Knowledge Article #2336), contact Illumina Technical Support [email protected].
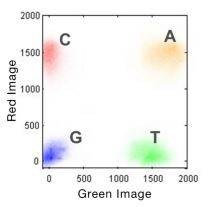
Background
The run folder sizes listed in this bulletin should be used only as an approximation. Folder size will vary depending on the raw cluster density and the number of clusters passing filter. Folder sizes are based on runs with optimal cluster densities for each platform and dual indexing. For runs on nonpatterned flow cells, the size approximations are based on runs with pass filter greater than 80%.
Additional run folder size considerations:
iSeq 100 folder sizes include FASTQ files generated by the Local Run Manager FASTQ workflow.
MiniSeq, NextSeq 500/550 (NextSeq Control Software v4.0 and higher) folder sizes include FASTQ files generated by the Local Run Manager FASTQ workflow.
MiSeq folder sizes include FASTQ files generated by the MiSeq Reporter FASTQ workflow and MiSeq (MiSeq Control Software 3.1 and higher) Local Run Manager FASTQ workflow.
NextSeq 1000/2000 folder sizes include local analysis output, which can add another 25-120+ GB depending on workflow.
NovaSeq 6000 folders do not include FASTQ files as part of the total output folder size.
Illumina recommends storing the output folder for iSeq 100, NextSeq 500/550, and NextSeq 1000/2000 runs on a network location. NovaSeq 6000 and NovaSeq X Series Control Software requires the output folder be stored on a network location.
iSeq 100
MiniSeq
Mid Output
High Output
Rapid
MiSeq
v3 chemistry
v2 chemistry
MiSeq i100 Series
See Knowledge Article
NextSeq 500/550
Mid Output
High Output
NextSeq 1000/2000 (Standard and XLEAP runs are expected to have similar sizes)
Note: Information for P4 runs is not available yet.
P1
P2
P3
P4 XLEAP
NovaSeq 6000
SP
S1
S2
S4
The output folder size in the above tables is reported in Gigabytes (GB).
NovaSeq X/X Plus
Values listed below are PER FLOW cell in Terabytes (TB).
1.5B
10B
25B
DRAGEN Analysis files can ADD the following additional data in terabytes (TB) to the expected Output folder size based on Analysis options selected. Approximate file sizes are based on a single flow cell, 2x150 cycle sequencing run.
Nano
0.8 - 1.2
2 x 25
Standard
14 - 16
Read Length
Output Folder Size in GB
2 x 150
1.5 - 2.5
Read Length
Output Folder Size in GB
2 x 150
2.3 - 2.6
Read Length
Output Folder Size in GB
2 x 150
7.0 - 8.0
2 x 75
6.0 - 8.0
1 x 75
2.0 - 4.0
Read Length
Output Folder Size in GB
1 x 100
2
Read Length
Output Folder Size in GB
2 x 300
22 - 26
2 x 75
19 - 22
Read Length
Reagent Kit Configuration
Output Folder Size in GB
2 x 250
Standard
22 - 24
2 x 250
Nano
1.6 - 1.8
2 x 150
Standard
16 - 18
2 x 150
Micro
3.0 - 5.0
Read Length
Output Folder Size in GB
2 x 150
62 - 66
2 x 75
39 - 46
Read Length
Output Folder Size in GB
2 x 150
160 - 170
2 x 75
92 - 97
1 x 75
50 - 78
Read Length
Output Folder Size in GB
2 x 300
85-95
2 x 150
50 - 55
2 x 101
40 - 45
2 x 75
35 - 40
Read Length
Output Folder Size in GB
2 x 300
140-160
2 x 150
89 - 99
2 x 101
65 - 66
2 x 75
44 - 55
Read Length
Output Folder Size in GB
2 x 150
165 - 170
2 x 101
103 - 126
Read Length
Output Folder Size in GB
2 x 150
170 - 180
2 x 100
100 - 130
2 x 50
70 - 80
1 x 50
40 - 50
Read Length
Output Folder Size in GB
1 x 36
20
2 x 150
185
2 x 250
400
Read Length
Output Folder Size in GB
2 x 150
370
Read Length
Output Folder Size in GB
2 x 150
730
Read Length
Output Folder Size in GB
1 x 36
240
2 x 150
2190
Read Length
cBCL Only in TB
BCL Convert (GZIP) in TB
BCL Convert (ORA) in TB
2 x 50
0.054 - 0.091
0.132 - 0.221
0.086 - 0.143
2 x 100
0.106 - 0.181
0.265 - 0.442
0.173 - 0.286
2 x 150
0.163 - 0.272
0.397- 0.662
0.259 - 0.429
Read Length
cBCL Only in TB
BCL Convert (GZIP) in TB
BCL Convert (ORA) in TB
2 x 50
0.34 - 0.57
0.83 - 1.38
0.54 - 0.89
2 x 100
0.68 - 1.13
1.65 - 2.76
1.08 - 1.79
2 x 150
1.02 - 1.70
2.48 - 4.14
1.62 - 2.68
Read Length
cBCL Only in TB
BCL Convert (GZIP) in TB
BCL Convert (ORA) in TB
2 x 50
0.85 - 1.42
2.07 - 3.45
1.35 - 2.23
2 x 100
1.70 - 2.83
4.13 - 6.90
2.70 - 4.47
2 x 150
2.55 - 4.25
6.200 - 10.35
4.05 - 6.70
Flow Cell Type
BAM (TB)
CRAM (TB)
GVCF+VCF (TB)
1.5B
0.4
0.1
<0.1
10B
2.5
1.0
0.2
25B
6.3
2.5
0.5
For any feedback or questions regarding this article (Illumina Knowledge Article #1508), contact Illumina Technical Support [email protected].
2 x 150